Simon Coulthard October 06, 2021
When it comes to website speed, every second counts. In this post, we will go through a full guide on website speed, from measuring it, to tips on how to speed up site page load time.
Contents:
1. Why technical SEO and page load speed matter
2. First step: Check website speed
2.1 PageSpeed Insights by Google explained
3. How to speed up page load time
3.1 Non-technical things you can do to improve website speed (file sizes, images, fonts etc.)
3.2 Technical things you can do to improve website speed (minification, JavaScript files etc.)
4. Other page load speed factors
1. Why technical SEO and page load speed matter
In general, before you even start thinking about search engine rankings and SEO measures to improve those rankings, you need to make sure that you take care of all the aspects connected with what we call “technical SEO”.
Technical SEO has to do with the functionality of a website. The first pre-condition for good rankings in search results, is that the site works properly. Of course, nobody will rank a website higher that does not load, or shows errors and broken links.
And the first technical element we want to look at is “page load speed”. Slow loading websites lead to two equally important problems:
- Unhappy users, especially if we look at mobile users. Aaccording to a Google study, 53% of users abandon a website if the page load takes more than 3 seconds.
- SEO problems: Search engines won’t rank a site near the top of results that people abandon, because of the website not loading quickly enough.
2. First step: Check website speed
Fortunately, there are several tools that can help you do a page load speed test. Even more, they can add an analysis of the issues that are preventing the website from loading faster.
Some of these issues may seem a bit too technical for the average website owner. Others are easier to check and fix. We will cover both of these later on.
What is the best website speed test tool? One that comes to mind is the one designed by Google itself.
2.1 PageSpeed Insights by Google explained
PageSpeed Insights from Google is a tool that has been launched mostly with experienced developers in mind. So, apart from the speed score it calculates, the analysis of the causes may be harder to understand.
Let’s break it down a little bit and make sense of the main parts.
First of all, the tool checks web performance in two different tabs, one for mobile and one for desktop. Your results on one may be very different from outcomes on the other. But the scoring scale is the same.
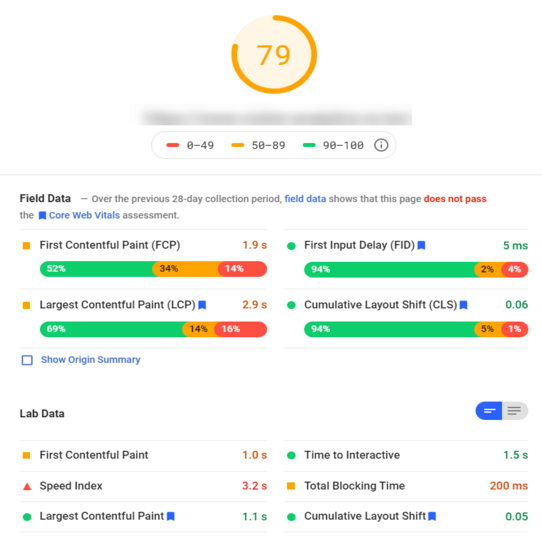
Based on six different site speed criteria, it generates a score from 0 to 100. Scores between 0-49 are in the “red” zone. 50-89 is an average result. 90-100 is “green”, giving the website a perfect evaluation in terms of page load speed.
Please note that different pages on the same website can have very different scores. Also, even the same page can vary a lot during the day, due to several factors that you may not be able to fully control.
Now, beyond the score, there is some more detailed information below.
Field Data: This section hosts some important metrics that break down exactly how much time it takes for the first elements, as well as the largest elements, to load. It also measures the time of browser response and ability for interaction. It does this based on the average load times from the previous 28 days.
Below this, the Lab Data section has some similar metrics, but they are based on test visits performed on the spot, after you submit the URL for testing. If your website speed has been improving lately, then you could expect the results under Lab Data to be better than the ones under Field Data. For all the metrics in this section, you should strive to stay in the green areas, or at least close to them.
Probably the most important metrics (and easiest to understand) are the FCP and the Time to Interactive.
First Contentful Paint (FCP) is the time it takes for your page to load any content (text, image or any other element that the user can “consume”). If this is below 3s, it should be fine. The best pages have an FCP of under 1s.
Time to Interactive is the time from the moment the site starts to load to when users can interact with it. Hopefully, this is under 3s as well.
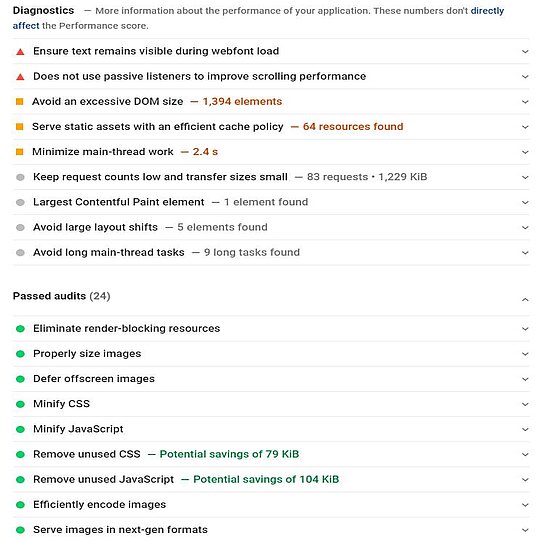
If these metrics don’t look very good, then you should scroll further down to see why. There is a Diagnostics section and Passed Audits below it. The first one highlights measures that could improve your performance. Look for ones with a red triangle near them.
Some of these are more technical. Examples:
- Eliminate render-blocking resources: This basically means that there are processes being loaded before your FCP. This could include apps or plugins that use JavaScript. The browser attempts to load these processes before rendering actual content. This can severely slow down the website. Read further down to learn what to do about it.
- Minify CSS or Minify Javascript: The way your website looks and acts is dictated by these files. In the CSS files, details like font sizes, colors, positioning etc. are established. CSS and JS files look like text files with a few characters per line. This leaves many white spaces in these files. White spaces lead to larger files, which take longer to load. Believe it or not, you could get a very small speed boost just by deleting these white spaces. And this is what “minify” means. In the next section, we will tell you how to do it.
- Minimize third-party usage: Sometimes, your template or the apps or plugins you installed may load external resources. There may be providers of services for which you have placed a script in your website header (analytics tools are no exception). Try to limit the number of third-party providers to ones you absolutely need. Otherwise, it can impact website speed.
Other issues affecting page speed are less technical, and any website owner, regardless of skill, can easily improve them. We cover them next.
3. How to speed up site page load time
3.1 Non-technical things you can do to improve website speed (file sizes, images, fonts etc.)
These are the things you can tick off, regardless of the type of site you have and regardless of your technical skills.
3.1.1 Reduce the size of your images: The larger the webpage, the more time it needs to load. And a big part of that has to do with images. Keep image sizes as low as possible. Smaller images load faster. Although, in some cases you do need larger images, don’t waste precious KB and seconds by using unnecessarily large images. In this example, this picture is displayed at a maximum width of 400-500 px on my website, even on wider screens. This is simply the space we have for it in our design.
Then you don’t need an image that is natively 1200px wide, which is larger, slower to load and needs to be resized by the browser every time the page loads. One with a width half the size would look exactly the same in this situation. So, for most images, you can reduce their size and you will gain extra speed. But be careful on cover images and bigger images in your design. Don’t resize them if they will be displayed in a larger size. This will decrease quality.
3.1.2 Use new image formats that are more efficient: .webp is one example of an image file format that was specifically developed to get the same picture quality with a smaller file size on websites. Try converting your images to this format and gain extra load speed.
3.1.3 Limit the number of fonts you use on a page: Each font loads an external resource which slows down the website. Using fewer fonts will also make things more visually coherent. Yet, by comparison, this will save less loading time than other measures.
3.1.4 Use videos and special effects or animations only below the fold: Above the fold is the first section of the page that your visitors see. It’s also the first one to load, so you need to keep it clean. If you have a large video right on top of the page, it will lead to slower loading times and less user satisfaction. However, if it’s further down, then there is time for it to load by the time users start to scroll and general speed score will not be affected.
3.1.5 Cache content: Caching is a process that uses high-speed data storage layers to access the content of a page quicker. Your website content can be saved as static content in a cache. This will also mean, depending on how the cache is set, that users may see the cached version of your page, instead of the live one. If you often make updates and edits to a page, then overusing cache is risky, as visitors may see an outdated version of the page, loaded from the cache. But especially for pages that don’t change all that often, cache is a great speed booster. The cached content won’t stay the same forever. It can, in any case, be reset or refreshed during set time frames.
Caching is not difficult to perform, depending on the type of platform your website is built on.
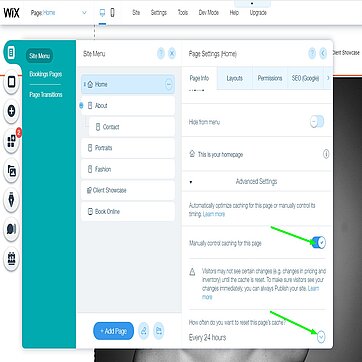
How to cache a Wix website:
To enable caching:
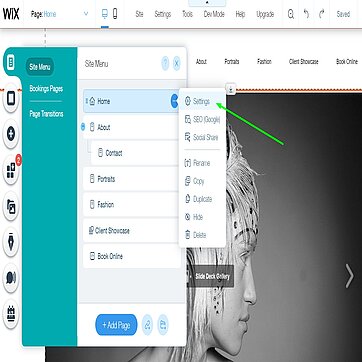
- Go to your Editor.
- Click Menus & Pages.
- Hover over the page you want to cache and click the Show More icon.
- Click Settings.
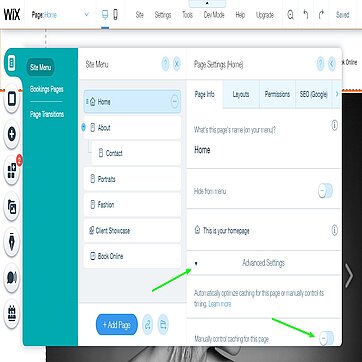
- Click Advanced Settings.
- Go to “manually control caching for this page” and change the toggle to enable it.
- You should now see: Enabled - the page will be cached.
- Then you can select how often you want to reset the cache for the page: every hour, every 24 hours etc.
How to cache a WordPress website:
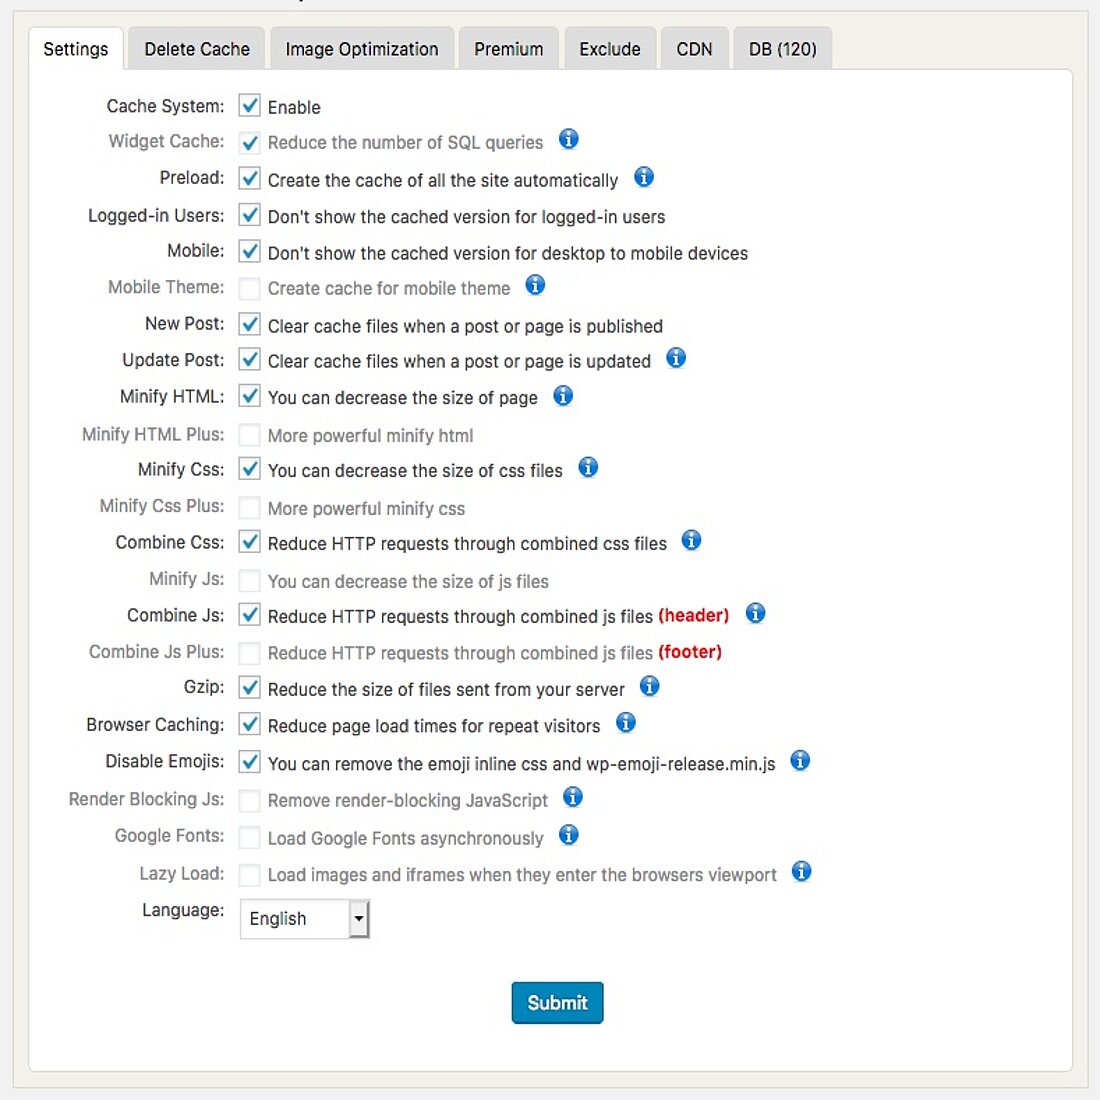
Go to the Plugins section in your dashboard and look for a cache plugin like WP Fastest Cache. Install it and then go to Settings. In the window, make sure cache is enabled.
You will also get more options to speed up your website with the same plugin, like file minification and the possibility to combine CSS, as well as to combine JS files. We'll discuss these in the next section.
If you have another type of website, there are usually apps and plugins developed to help you out with this. For advanced users and developers, there are open source caching tools available online.
3.1.6 In general, keep your website clean:
Do not keep unnecessary files, elements, or apps if you are not actively making use of them. Keep things simple and don’t overcomplicate the structure of your website, in order to make it load faster.
3.2 Technical things you can do to improve website speed (minification, JavaScript files etc.)
As seen in the section about page speed insights from Google, there are several issues of a technical nature that will show up when you assess your page speed. We will try to explain how to make sense of and solve some of these issues. However, if you feel that these are above your skill level, you may prefer to work with an expert on these problems.
Also, if you do not self-host your website and keep it on your website builder platform (e.g. Weebly, Wix, Squarespace), then you do not need to worry about any of the aspects described in this section. These web builder platforms also host the websites of their customers and usually do a very good job of ensuring that they load as fast as possible.
3.2.1 Defer or Async JavaScript files to eliminate render-blocking resources. We talked about render-blocking resources in Section 2.1. The browser loads elements and scripts in the order they are presented in the website files. First, it attempts to load the files in the <head> section. That’s where you usually find a lot of third party scripts belonging to the apps the website is using (e.g. analytics, ads services and many more).
The actual content in the <body> section has to wait for these scripts to be executed. This means that the visitor will not see any content until the apps in the header of the site are started. We already suggested using only those apps which are completely necessary and remove all others. What you can alternatively do is to “postpone” the loading of these scripts or “separate” them from the content.
If you have some basic knowledge of HTML, you can do this directly in the code of your website. If you add defer to the scripts that are slowing down the site (<script src=”scriptname.js” defer></script>), the browser will download them in the background, without blocking the content. If you add async (<script src=”scriptname.js” async></script>), the effect is similar, just that the script becomes completely independent from the rest of the page, loads separately, and is executed whenever it is done.
Alternatively, defer and async can be done using plugins/apps/extensions. In WordPress, there are plugins like Async JavaScript or others that will easily do this for you, without needing to know code.
Please note that working with these will affect the functionality of the website. You may need to undo some of the changes if parts of your page do not work as predicted.
3.2.2 Minify CSS and JavaScript. We already explained what minification is (deleting white space from the lines in your files). You would most likely not want to do this manually. If you have an HTML website and don’t use a CMS, one way to do it would be to use a tool like CSS Minifier, which will require you to input the original text in the CSS/JS files and obtain the minified result. Download the minified file and replace the old file with it.
Please note that if you will need to make changes to the files in the future, it will be a lot more difficult to work with the content of the files, as there will be a big chunk of text with no paragraphs and no spaces between words.
WP Fastest Cache and Fast Velocity Minify are two of the many plugins that offer minification for Wordpress websites.
3.2.3 Combine CSS and JS files
Your website may be using several CSS files that shape the styling of your page, as well as several JS files that dictate various actions and processes on it. The more complex the website (the more plugins/extensions/apps you have installed), the more CSS and JS files will run in the background. And the more of these files are, the longer it takes to load them.
Combining them automatically merges all of these files into a single one, so instead of as many as 30-40 CSS or JS files, there will only be one large file for CSS and one for JS. This will help the website load a lot faster.
Note: please back up the site before opting to combine files, as it may break some of the functionality and you may need to undo it.
Again, the apps or plugins that offer other page speed features (minification, caching etc.) should also offer the option to combine CSS and JS. If you don’t use a CMS and you handle the website code directly, there are options online to help you with combining your files.
3.2.4 Use CDN
A CDN (content delivery network) is a network of geographically distributed servers that can cache content and provide it faster to website visitors, depending on the location of these visitors. This can be especially important for websites that have a worldwide audience. Modern hosting providers offer CDN by default, being able to load the content from a node that is closer to the location of the user. This can make a big difference in terms of page load speed.
So, check to see if your hosting provider uses CDN and, if not, consider switching to one that does.
4. Other page load speed factors
There are some aspects of page load speed that are not under your control. In your page speed insights, you may see a line about reducing server response time. This is entirely dependent on the way the server where the website is hosted is configured. There is little a website owner can do about that.
Another factor is whether the web server is using Gzip compression of the files, which can reduce the time you wait for the web page to load.
And the list could include other aspects, but the ones that make the biggest difference have been covered.
Have you gone through the entire list? Can you apply some or all of these to your own website? Once you do, go back to the PageSpeed Insights or to other page speed checkers like GT Metrix and see if you gained precious seconds. If you do it properly, you should spot a significant improvement.
Share article
Get Started for Free
Gain World-Class Insights & Offer Innovative Privacy & Security

You might also like
Insights to Your Inbox
Receive a monthly summary of website intelligence news, advice, and also product updates. And don't worry, we won't tell sales!


