
- Frequently Asked Questions

- All About Features
- How to Install the Tracking Code
- User Guides
- Integrating With Other Platforms
- Legal, Data Privacy & Certificates
- White Label Analytics
- Glossary
- Affiliate Program
- Contact
Website Settings
All You Need to Know About Your Website's Settings
What It's All About

In Website Settings, you can manage specific components of your website such as general settings, subscription, visitor segments, export and more. If you have more than one website to manage, you can switch between them using the drop-down menu in the top left corner.
Important Hint:
- If you have more than one website in your account, remember that these settings only apply to the selected website within the dropdown in the upper left corner of this view. If you want to apply a certain setting for all the websites added to your account, you need to repeat the setting for each website.
- Privacy Center has been moved to the main navigation bar. Everything about the privacy settings can be found here.
General Website Settings

Here you will find all the important general settings, like time zone, email reports, and many more, that you can define for each website. You can update the website's settings anytime you like. These settings are available for both website owners and website contributors.
First Day of the Week

Here you can set up the first day of the week depending on your own calendar. This will be visible in all the report blocks and graphs within the app as being the first day of the week, when looking at the data by "Week".
Email Reports

This section allows you to manage the email notifications you want to receive. The Statistics Reports contain a set of the most important statistics (number of visitors, uniquevisitors, conversions, and more) regarding your website. This will provide you with the most critical information while you are on the go, without the need to log into your account.
Here’s how you can enable the email reports:
- Enter your email address: Specify where you'd like to receive notifications.
- Enable statistics reports: Toggle the switch to "on."
- Choose your frequency: Select daily, weekly, or monthly updates.
Important Hints:
- You cannot opt out of receiving service messages, such as payment, security or legal notifications.
- Website statistic reports will also be received by potentially existing contributors of this website.
Date & Time

This section allows you to define the local time/time zone for your website. Select your time zone from the dropdown list.
This is an important step which will enable the statistics to display correctly and give you more sophisticated results for decision-making.
Important Hint: If you have multiple websites, remember to set the time zone for each newly added domain.
Ignore (Own) Visits for Tracking by IP

If you do not want certain visits to be considered in the data within your account, you have three options:
- Ignore visits from this browser: If you choose to use the "ignore" function for your own views of your website, the application will not count any of this data. Visits from other people using the same browser (but who have a different IP address), will still be tracked. Note: A cookie will be set in your own browser to ensure that your visits are ignored.
- Supply selected visitors with a link, which will not be tracked: Unsure of your team's IP addresses or simply want to exclude specific visits? Share the unique link displayed in this section with them. Visiting your website through this link will automatically prevent their activity from impacting your data analysis.
- Ignore specific IP addresses: Ignore visits from a specific IP address or from classes of IPs by using the * symbol at the end of the numeric label — e.g. if a class of IPs starts with 192.168.123 just add 192.168.123.* and the entire class will be ignored. After you enter the IP address, click Add to List and Save Changes to apply the settings.
URL Appearance

You can customize how your website's URLs are displayed. Choose whether to display your website pages within the app as complete URLs or, as before, as predetermined html page titles – based on the text in the page URL.
Select the option that best suits your needs:
- Show Page Title & URL: This provides a clear and descriptive view of each page, including both the title and the full URL. It enhances user experience by giving visitors a quick understanding of the page's content.
- Show Only Entire URL: This option displays only the full URL for each page. While it ensures you always see the complete address, it may appear less user-friendly as it lacks descriptive context.
Domain Whitelisting

Domain Whitelisting lets you include your website's tracking code on related domains and subdomains, ensuring comprehensive visitor data.
For instance, if your website is "mywebsite.com", you can whitelist your tracking code for mywebsite.shopify.com and track all the visits under a single instance. You can also add rules to whitelist all subdomains for a specific domain in a similar manner: *.anotherwebsite.com.
How To Implement Cross-Domain Tracking
Our cross-domain tracking lets you see website traffic from all your domains and subdomains within a single account and site. This provides a consolidated view of your audience and website performance across your entire online presence all in one place!
Setting Up Cross-Domain Tracking:
- Log in to your account and select the website you want to enable cross-domain tracking for.
- Navigate to Website Settings > General.
- Scroll down to the Domain Whitelisting section.
- Click Domain To Whitelist.
- Enter the domain or subdomain you want to track.
- Click Add to List.
- Repeat for any additional domains or subdomains you want to track.
- Once finished, click Save Changes to confirm.
- Navigate to Website Settings > Tracking Code.
- Locate the tracking code for your website and click Copy Snippet to Clipboard button to copy the code.
- Access the source code of each subdomain you whitelisted and paste the copied tracking code into the appropriate location within the source code of each subdomain.
Now you're all set! Our app will now track visits from your whitelisted domains and subdomains, providing you with a unified view of your website traffic.
Note: You can view the statistics of the whitelisted domains under the Pages Dashboards.
Reset Website Data

This option allows website owners to permanently erase all tracking data associated with this website within our application. The action, which can only be performed by a website owner, will remove all your statistics from your account. Your preferences will be kept the same as before. You will have to confirm this action by entering your password.
If you prefer to receive the deleted data via email for backup purposes, we will first send you a link with your "website statistics archive" and only then reset data. Please do not forget to activate the corresponding checkbox in the modal which appears after clicking the "Reset Data" button. These processes might take up to 24h – based on your website traffic.
Important Hint: While the reset is in progress, your statistics will not be tracked!
Subscription Settings
Overview

This section empowers you to manage all aspects of your website's billing conveniently. You can enter your billing information, manage your payment method, choose the perfect pricing plan based on your website traffic and view your invoices.
Billing Information

The information you add will be used and shown on the automatically generated billing statements for this website.
You can add or edit the following information:
- Business name (required)
- Business sector
- Street & Street Nr.
- ZIP Code
- City
- State
- Country (required)
- First name
- Last name
Once you've finished updating your information, simply click "Save Changes" at the upper right corner. Feel free to edit it anytime!
Important Note: Changes to your billing information will only be reflected on invoices generated after you save the updates.
Payment Method

In this section, you can add or change your payment method. Currently, we can only accept PayPal or credit card payments.
You can also turn off the auto-renewal here.
Important Notes:
- If you have a Wix website, the entire billing will be done via Wix. Unfortunately, we cannot provide the information. Please check directly with WiX or log in to your Wix account.
- If you updated your payment method, it will only be displayed here after your next billing cycle.
Current Plan

This section provides you with the information, on which pricing plan you are currently on – based on your website's traffic. The more traffic your website has, the higher your success. However also our cost increases in processing your data.
You can start with the "FREE forever" plan that makes it easy for you to test drive, with zero commitment and pay as you grow.
Unlock more features! Upgrade your plan by tapping the "+" or "Change plan" button.
Invoices

Here, you can view a list of the invoices generated for the selected website that you can view and save as a PDF for future use.
The list displays the following information:
- Name of the Plan
- Billed date
- Amount
- Status
Simply click the open new tab icon to view the invoice.
Alternatively, you can view the invoices for all your websites by going to Account Settings > Invoices.
Important Note: These invoices only refer to "non-Wix websites". The billing for Wix websites is done separately on WiX.
Module Settings
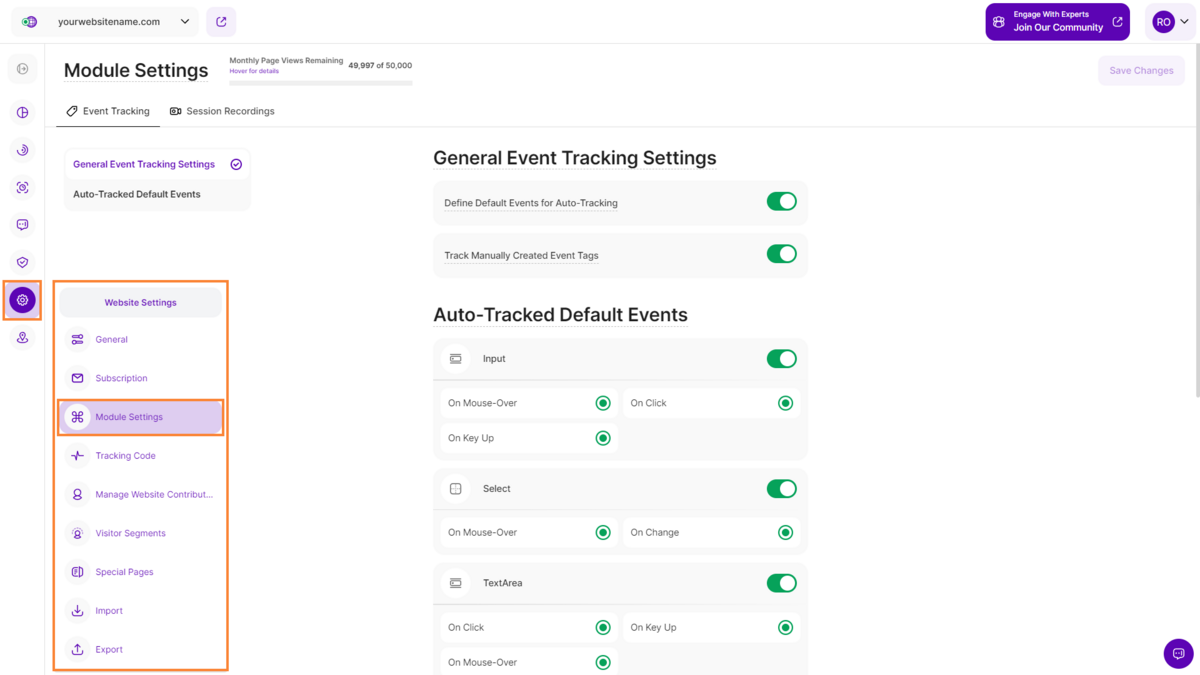
Choose a module offering additional settings and set it up according to your needs. Here, you can manage the settings for your event tracking and session recordings.
Event Tracking
This section of the Module Settings allows you to select which type of event you want to be tracked by our platform: manually created event tags, default events being auto-tracked or both.
Once accessed, you will have two types of settings available:
- General Event Tracking Settings: This setting allows you to enable or disable the following options:
- Define Default Events for Auto-Tracking - enable/disable only the tracking of automatically identified events
- Track Manually Created Event Tags - enable/disable only the tracking of manually added events
- Auto-Tracked Default Events: This setting shows you what elements (Input, Select, TextArea, Button, RadioButton, Checkbox) on the site could be automatically identified with the current version, and the actions (On Mouse-Over, On Click, On Key Up, On Change) that can be tracked for each element.
Important Notes:
- This feature acts 100% complementary to any manual event tags, so without the need to add any manually created tag snippets to your source code. Just turn the Auto-Tracking ON to get it started.
- For Wix websites, only Auto-Tracking is possible (at least for the moment), so there will be no option to track manually created event tags.
- The Labels of the elements, are automatically procured from your HTML page, so directly from the code, as they were called when the site was built. If you want the label of a tracked element to have a different name, that needs to be changed within the HTML of the page directly.
Both the Category and the Action labels of these auto-tracked elements are standard (as per the list presented above) and cannot be edited. - Elements that are part of a pop-up, or something dynamic that appear on your page as a result of certain actions taken by the user, they may not be properly treated by our system (e.g., Hovering an image of a product that will make a "Buy now" button to appear, might be one of the cases when we cannot track fired events on that newly appeared element, since it's not something static that was on the page from the beginning).
- Very soon, we will also add other elements for which these fired events can be tracked, such as images, links, videos etc. for the next version(s).
Session Recordings Settings

This section allows you to define how you want to set the recordings based on your preference. These configurations pertain exclusively to the "Session Recordings" module and do not impact your website or account settings in any way.
Essentially, there are five aspects that can be customized within this module:
- Record All Pages: This activates the feature to capture sessions for every visitor navigating any page on your website. Once this option is chosen, no further customization choices will be available. In essence, it implies that every interaction by visitors on your website will be documented, with the recording influenced by the conditions you've defined for individual visitor sessions.
- Record Only Specific Pages: Once this option is selected, only visits to your defined pages within your website will be recorded. Two further options are available to you:
- Select Page From Website: Select a page from the autogenerated suggestion list or search for a URL by typing parts of the URL into the field. Note: Please make sure that all “/” are placed correctly in the URL. Otherwise, you may experience problems with the tracking of visitors.
- Select Custom URL Pattern: Select one of the options in the drop-down list to define which rule should be utilized for this funnel level to count visits.
- Sessions to Record: This allows you to choose between recording all sessions or only those with activity.
- Only record sessions with a minimum duration of X seconds. It allows you to define the minimum session length. If you don’t want those quick visits to be recorded, then this option would work best for you. Once selected, another option will appear below:
- Minimum Duration Recording (in Seconds): Simply type in the duration (in seconds) in the text field.
Important Note: If you update your settings for the session recordings module in any way, you always have to click on the button "Save Changes" at the top right of this view.
Visitor Segments

Visitor Segments is a powerful feature that allows users to tailor their analytics and gain insights into specific groups of website visitors. This enables you to categorize visitors based on various attributes, making it easier to analyze their behavior and preferences.
The Visitor Segments page is divided into two main parts:
- Existing Visitor Segments Table: This part displays a list of visitor segments that have already been created.
- Create a New Segment: This area allows you to create new visitor segments.
Important Note: Access to this feature requires the purchase of a minimum pricing plan. If you do not have the required plan, you will be prompted to upgrade when attempting to create a new segment.
Everything about the corresponding functionality of this module and much more can be found here.
Special Pages

Here you can create & maintain your conversion pages and dynamic pages.
Conversion Pages

With this feature you can define for which page of your website that your visitors visit, you would like to see a conversion in your statistics within the application. You can also group single pages to one conversion page in order to see cumulated statistics. This will allow you to better evaluate the actual success of guiding your visitors through your core processes (i.e. set a conversion when a visitor has completed the checkout on your homepage, has subscribed to your newsletter, has registered as a website-member, etc.). Conversion pages can only be defined by yourself. Until you have done so, no numbers of conversions will be shown.
If you want to add a new conversion page for the selected website, please click on ADD CONVERSION PAGE. A new modal will open for which you have to fill out the fields. Try this functionality and analyze your results, there is nothing that can go wrong and your visitors will not notice anything.
Important Hints: You can see the statistics of your self-defined conversion pages in the Page Views, Sessions & Visitors Dashboard (Main Report Block) as Converting Visitors or you can go to Pages --> Conversion Pages.
Dynamic Pages

In this view you can group identical pages with different URLs (i.e. the same product page for different articles) of your website for clustered statistics.
Imagine you have an E-commerce website. There is a high chance that you will have the same "Thank you" page for all product purchases at the end of the checkout (even though this page has different dynamic parameters in its URL, based on the purchase). If you do not cluster these URLs, you will see data on each "Thank you" page even though it is the same. Clustering these URLs allows you to see combined statistics for this page, but it will not change your data.
If you want to add a new dynamic page for the selected website, please click on ADD DYNAMIC PAGE. A new modal will open for which you have to fill out the fields. Try this functionality and analyze your results, there is nothing that can go wrong and your visitors will not notice anything.
Import

You can now seamlessly integrate your existing Universal Google Analytics (UGA) data with our app!
We strongly recommend that you import your data after successfully installing our app on your website and having at least one visit tracked by our app to ensure continuity.
As the data is imported, you may see it in real-time. We'll import your data chronologically, starting with the most recent information, giving you a clear picture of your website's historical performance.
More details can be found here.
Important Note: You can only import the data once per website!
Export

Say goodbye to data limitations! Our revamped Export feature empowers you to effortlessly export even the most extensive datasets for your website including company names, UTM Campaigns, and more. Gain deeper understanding and unlock actionable insights with a breeze.
This view is divided into two tabs:
Important Note: Great news! We've removed the 31-day limit, giving you the flexibility to analyze your data for any timeframe you need.
General Export

This section allows you to download specific data from the website you've chosen. Explore your options and tailor your export to your needs with these easy steps:
- Choose Your Data: Select whether you want to export Visitors data or Page Views (formerly "Visits") history, depending on your specific needs.
- Set the Time Frame: Refine your export to a specific time range, whether it's the past day, week, month, or a custom date range. This allows you to focus on the data that matters most for your current analysis.
- Pick Your Format: Download your data in either CSV or XLSX format, compatible with popular spreadsheet and analysis tools. Choose the format that would best suit your workflow and preferences.
- Click and Export: It's that simple! With just a few clicks, you can now have a comprehensive file ready for in-depth exploration and analysis.
Refer to the list below for the specific columns included in the exported file, determined by the data option you choose:
- Visitors data:
- Visitor location
- IP
- Visitor Type
- Device
- OS
- Browser
- Last visited page
- No. of visited pages in the session
- Time
- Company Name
- Company Type
- Visit with Recording
- Visit Duration
- Recording Seen
- Campaign Source
- Campaign Medium
- Campaign Term
- Campaign Key
- Campaign Name
- Page Views history:
- Visitor location
- IP
- Visitor Type
- Device
- Operating System
- Browser
- Page
- Time
- Pages Count
- Session Duration
Important Notes:
- The visibility of specific information is restricted based on your data privacy settings, contribution role, and subscription plan.
- If you are subscribed to the minimum pricing plan that includes the Company Reveal feature, you will also see the Company names where the IP Address is registered to and the Company Type would be listed as Banking, Business, etc. Otherwise, it will only display the ISP/Carrier Network name with the Company Type listed as isp. You can read more about the Company Reveal feature here.
- The following information are exclusively accessible to the website owner or editor: Company Name, Company Type, Visit with Recording, Visit Duration, Recording Seen, Campaign Source, Campaign Medium, Campaign Term, Campaign Key, Campaign Name, Pages Count and Session Duration. Check here about the contribution roles.
Export(s) via Email History
")
This new tab under the Export view displays the history of the requested exports (sent via email) for the past 7 days.
The table is consists of the following columns:
- Type of Export: Shows either Visitors or Pages based on the type of data that you have exported.
- Time Period: The specific date range covered in the exported data set.
- Status: The current status of your export, either "In Progress" or "Completed".
- Progress: Shows the percentage of completion for ongoing and completed exports.
- Requested At: The date and time the export request was submitted.
- Completed At: (Appears only for completed exports) The date and time the export was finished.
- File Format: The format you chose for the exported data, either csv or xlsx.
- File Size: The size of the downloaded file.
- Action: Shows two options - Download File or Cancel export.