- Frequently Asked Questions
- All About Features
- How to Install the Tracking Code
- User Guides
- Integrating With Other Platforms
- Legal, Data Privacy & Certificates
- White Label Analytics
- Glossary
- Affiliate Program
- Contact
Event Tracking
Detect Any Action or Event Taking Place on Your Website!
In this submodule, you will be able to create your very own tags for any event you would like to be tracked, add them to your website and see how the firing of an event develops over time. You can also use auto-tracking to scan your website for default elements without having to add any extra code & track them right away. This feature helps you immensely in tracking events you specifically want to know.
Important Note: Manual Event Tracking is not available for Wix websites (no custom tags can be created, as there is no control of the code for specific elements on the page). The Auto-Tracking will work.
This support article is structured into the following sections:
- Auto-Tracked Events
- All Triggered Auto-Events Tracked
- Line Diagram
- Auto-Tracking Previewer
- Live-Tracking Preview
- Filter & Group Tracked Events
- Manual Tracked Events
- All Triggered Manual Events Tracked
- Line Diagram
- Event Tag Generator
- Integrating an Event Tag Within Your Website
- Event Tracking Settings
Right above the tiles, you can see a date picker. This enables you to select a certain time period, or specific day, for which you want the Dashboard's data to correspond.
It is crucial to limit the presentation of data to specific dates or timeframes during which you executed potential campaigns or implemented other strategies. This will allow you to assess the effectiveness of these actions and use the insights gained for future planning.
Some General Hints
- Make sure you have updated your app and tracking code with the latest version (replace the current tracking code with the fresh one recently released), so you can benefit from this feature.
- The limit for the events included is on a monthly basis. Resetting your data will not reset the counter of the fired events. It will start tracking again next month, or from the moment an upgrade takes place and the limit is lifted.
- A lot of elements contain descriptions if you hover over them. Just let your cursor run over various elements and discover how much data is actually packed into a tile.
Auto-Tracked Events
The first tab of this submodule is the "Auto-Tracked Events". It is divided into two sections, "All Triggered Auto-Events Tracked" and the "Line Diagram".
Together, these sections offer a complete and insightful overview of the events that have been triggered and were auto-tracked.
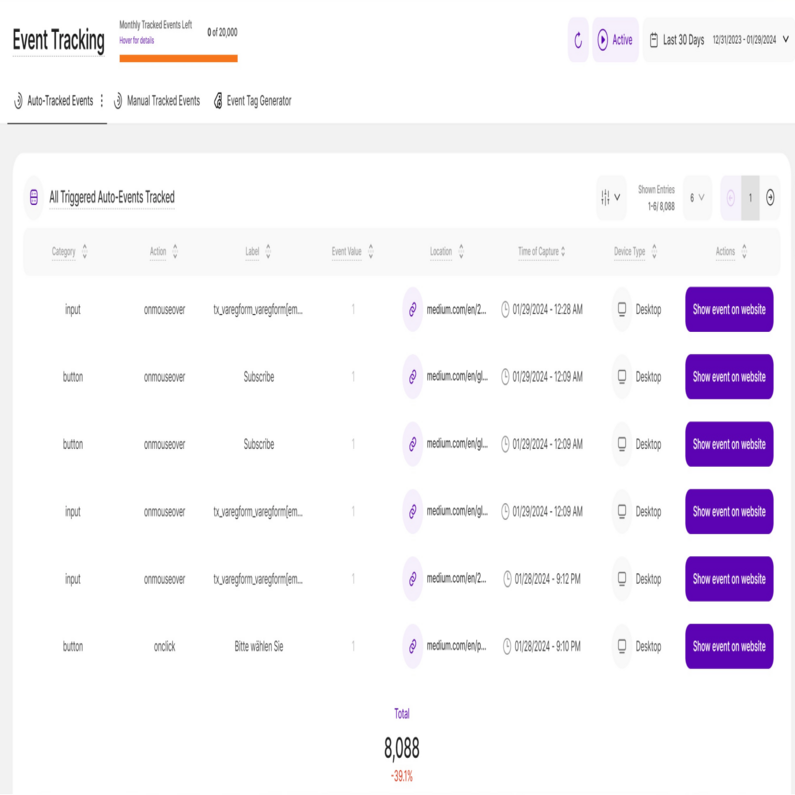
This table gives an overview of all the auto-tracked events that have been fired throughout the selected period of time. Each line represents one firing of an event. So if the same event was fired 20 times in the selected period of time, then there would be 20 lines for this event.
The table contains the following columns:
- Category: Shows the event type like input, select, textarea, button, radiobutton, checkbox, etc..
- Action: Shows the action on which the event was triggered, like onmouseover, onclick, etc..
- Label: Displays the name of the page the event was auto-tracked on.
- Event Value: For auto-tracked events, the value will always be 1. (optional field)
- Location: Provides details on which page URL the event was fired. Clicking on the link icon next to the page URL will open up the corresponding page in a new tab.
- Time of Capture: Shows the exact date and time the event was triggered.
- Device Type: Tells you which device type was used to trigger the event on your website.
- Actions: Here you can view the auto-tracked event on your website.
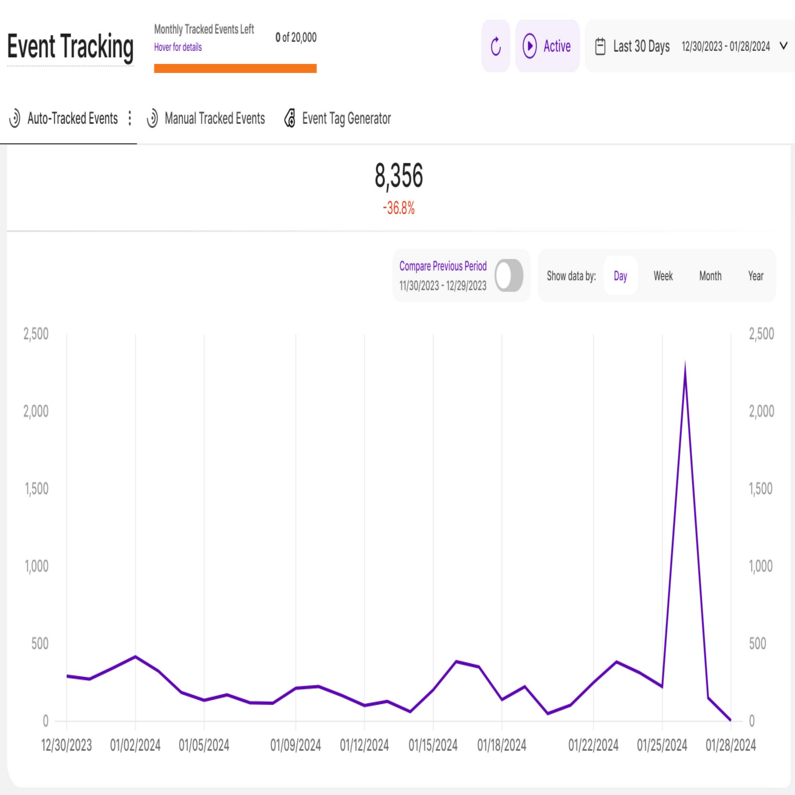
The line diagram basically reflects the data presented to you in the table above. You will notice that only one line is visible – referring to the entire amount of events shown or filtered in the table above – by default.
Important Hints:
- Make sure the desired time period is selected, so that the data matches what you want to see. The default is "Last 30 Days".
- On the top right, a radio button labeled 'Compare Previous Period' (with dates underneath) lets you compare your current data to the equivalent period before it. The light purple line illustrates the data from that previous time period.
- To get more detailed information, hover your cursor over each data point on the line diagram. This will display a tooltip with relevant insights, including a comparison of each period when you enable the "Compare Previous Period" button.
The Live Preview shows exactly what actions were triggered on which elements, viewing this directly within an image with your web page itself.
Within the main table of tracked events, there is a "Show event on website" button, for the auto-tracked elements.
Click that and a preview of the page itself will be open in a new tab with the possibility to see important details about your auto-tracked events, in a more human readable way, than only the table of the tracked events you've been previously looking at.
Live-Tracking Preview
![]()
![]()
The first image is a sample of the screen that you will see once you click on the "Show event on website" button. There are three important parts here:
- Live-Tracking Mode Settings Icon: Tap this to open the settings.
- Button element: In this sample, we have the "Subscribe" button.
- Breakdown of the events tracked for the BUTTON element: This box shows a complete breakdown of the events tracked for this button element for the selected time period. It shows the event type(s), the breakdown for each of the devices types and the grand total.
Tapping the Live-Tracking Mode Settings Icon, will open the settings view(see second image). Every row of this Settings Menu shows your defined settings and some of the auto tracked elements related information:
- Results Based on Period: All the displayed results are based on the selected period of time. If you wish to see the data for a different interval, go back to the app, change the period and re-open the previewer. Note that the numbers do not update in real time, so any event occurring while being here will not be visible, unless you reload the page or close the previewer and get back to it.
- Sum of auto-tracked elements on page: This is the total number of auto-identified elements on this page. This does not mean that there are actions tracked on all of them, it is just a count of elements that can be auto-tracked on this URL. Hover each of the elements highlighted for more details to display.
- Sum of tracked auto-event triggers: The number of all event triggers that were tracked for all your auto-identified elements in the selected period of time.
- Show trigger sums & all auto-tracked default events: Activating this option will highlight all default elements which could be auto-detected by our system(only visible for you in this live tracking mode). Furthermore you will see a sum of all event triggers for each highlighted element in the selected period of time. Clicking on these trigger sums will provide you with more details about how this sum is generated.
Important Notes:
- To make sure you have the best user experience possible, please deactivate all AdBlockers so that you do not encounter any technical issues when using this. Also, please make sure you also clear the cache memory of your browser (Ctrl + Shift + Delete).
- The displayed amount of triggers always refer to the time period previously selected within the app.
- During the event preview mode your visit is NOT counted nor do your actions cause any event trigger count.
Hint: Our tracking may not currently capture data from invisible elements that appear only after a user interacts with the website. This includes elements like login text input fields, search fields revealed by clicking an icon, etc. These interactive elements may appear as "0" on the live preview because they aren't visible when the page first loads, but they are tracked correctly on the table. We're currently working on improvements to capture data from these dynamic elements in the future.
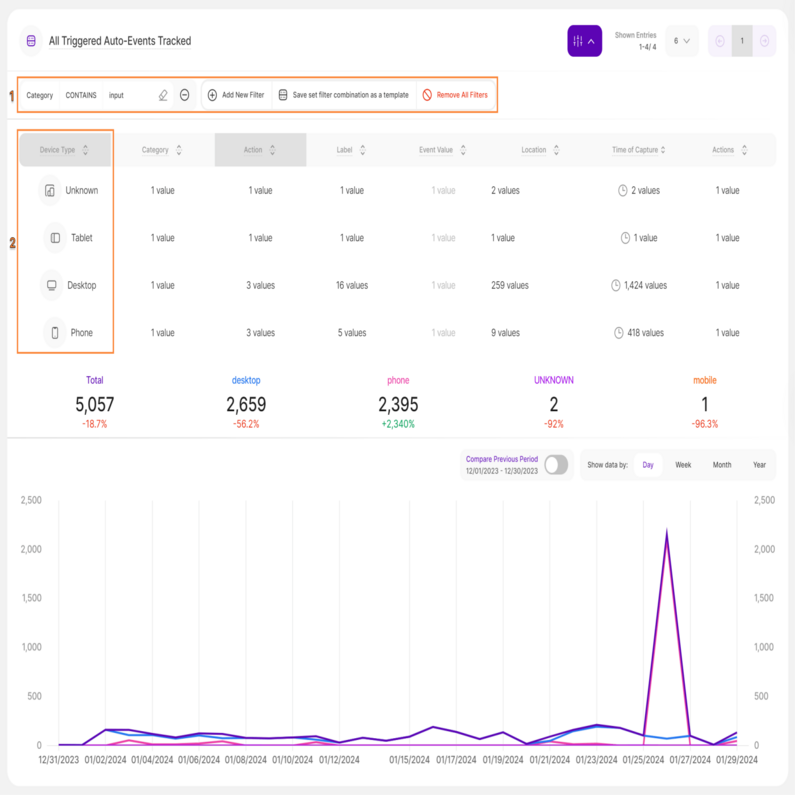
The table for both Auto-Tracked Events and Manual Tracked Events allow various filtering and grouping options. The main difference between filtering and grouping is relatively simple:
- Filtering narrows down the displayed events in the table by applying the chosen filter. You can combine filters depending on the data that you need.
- Grouping does not decrease the number of events visible in the table; instead, it links events based on the specified field. Under the table, you can access a detailed breakdown and the total count for each item in the group.
Play with it on the table, and you will easily understand the difference. Both approaches will give you simple yet powerful possibilities for displaying your data and retrieving interesting facts from it.
It is essential to understand the behavior of the line diagram. After grouping the data within the table, it becomes evident that to view the line diagram for a specific group, users must set the filter beforehand. Additionally, users have the option to select or deselect items within this group, streamlining the data to their needs. Deselecting an item will result in the removal of its corresponding line from the diagram.
Important Hints:
- The more filters you activate for the main able above, the less events will be shown in the table. This will also reduce the amount of events reflected in the line diagram shown below the table.
- You can easily create filter templates for your set filter combinations. Once you have added a filter combination to the main table which you will probably re-use more often in the future, just click on the "Save Filters as a Template" button.
Manual Tracked Events
Moving on to the "Manual Tracked Events" tab (not available for Wix websites), you'll find a familiar layout with two sections: "All Triggered Manual Events Tracked" and the "Line Diagram", offering a comprehensive overview of manually triggered events and their visual timeline.
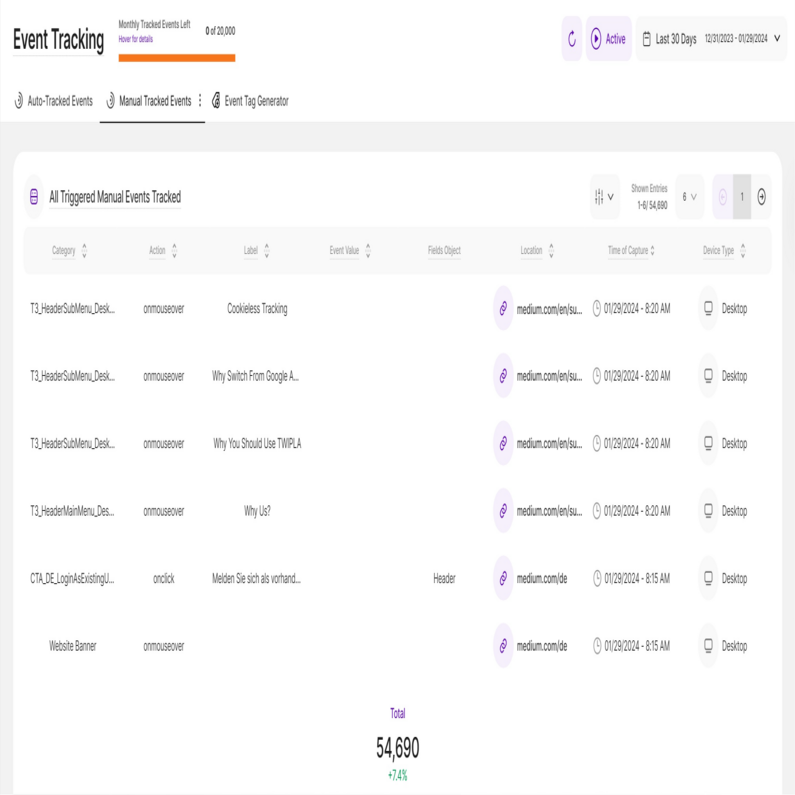
This table gives an overview of all the events that have been fired throughout the selected period of time. Each line represents one firing of an event. So if the same event was fired 20 times in the selected period of time, then there would be 20 lines for this event.
The table contains the following columns:
- Category: Shows the value which you typed in manually for a manually created event tag of a triggered event for the field "category" – the event type like input, select, textarea, button, radiobutton, checkbox, etc..
- Action: The event action column either shows the value which you typed in manually for a manually created event tag of a triggered event for the field “action” like onmouseover, onclick, etc..
- Label: The event label column either shows the value which you typed in manually for a manually created event tag of a triggered event for the field “label”.
- Event Value: The event value column either shows the value which you typed in manually for a manually created event tag of a triggered event for the field “value”.
- Fields Object: This is an optional field used for additional parameters.
- Location: Provides you with the URL of the page the event was triggered on. Clicking on the link icon next to the page URL will open up the corresponding page in a new tab.
- Time of Capture: Shows the exact date and time the event was triggered.
- Device Type: Tells you which device type was used to trigger the event on your website.
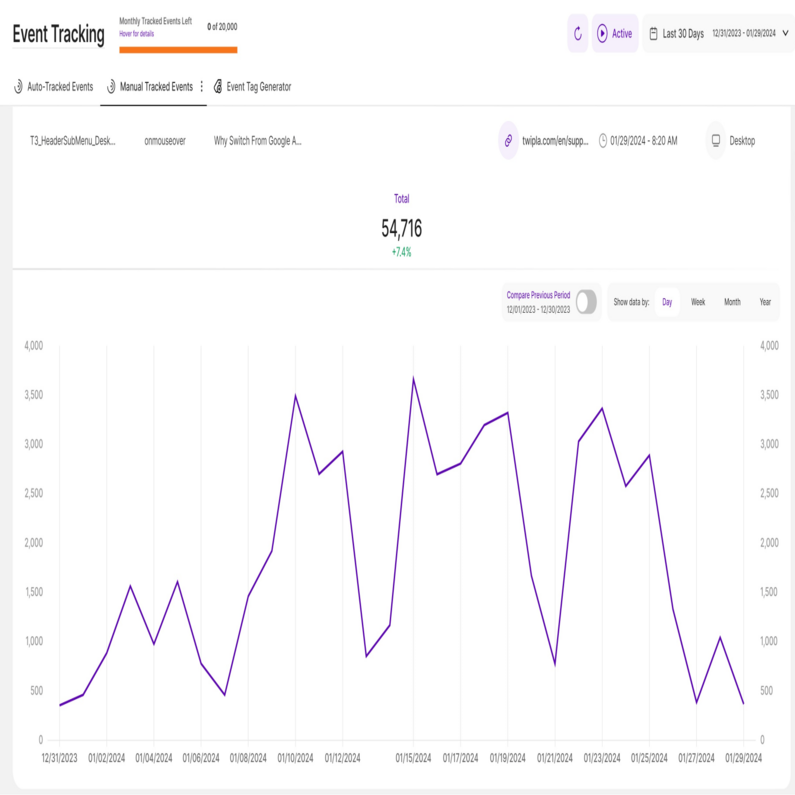
The line diagram basically reflects the data presented to you in the All Triggered Manual Events Tracked table. You will notice that only one line is visible – referring to the entire amount of events shown or filtered in the table above – by default.
Similar to the Auto-Tracked events, you'll find a radio button labeled 'Compare Previous Period' (with dates underneath) on the top right of this section which lets you compare your current data to the equivalent period before it. The light purple line illustrates the data from that previous time period.
To get more detailed information, hover your cursor over each data point on the line diagram. This will display a tooltip with relevant insights, including a comparison of each period when you enable the "Compare Previous Period" button.
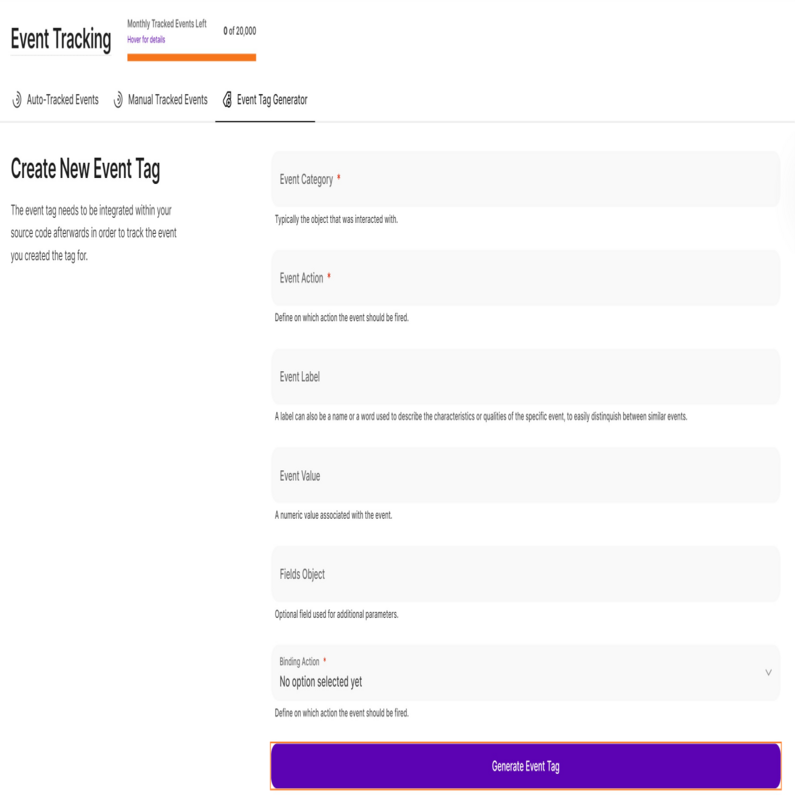
The final tab in this submodule is the "Event Tag Generator" (not available for Wix websites). Instead of heading to your website, you can easily create new event tags right within the application whenever you need to track something new.
In general, an event tag can be made of the following fields:
- Event Category: Typically the object that was interacted with, i.e., an image or button (mandatory field).
- Event Action: Define on which action the event should be fired, i.e., play, click, pause, etc. (mandatory field)
- Event Label: Can be a name or a word used to describe the characteristics or qualities of the specific event, to easily distinguish between similar events, i.e., product video, support image, etc. (optional field)
- Event Value: A numeric value associated with the event, i.e., 1, 2, 3, etc. (optional field)
- Fields Object: Any additional parameters you might want to add yourself to identify the event (optional field)
- Binding Action: Choose the action you want the event to fire upon, i.e., onclick, onmouseover, onkeyup, etc. (mandatory field)
Once you have defined all the fields above and have chosen the action you want the event to fire upon, click the "Generate Event Tag" button. After the event tag is created, you'll see the next window wherein you can copy the generated event tag. You can also create another tag by tapping the "Generate Another Event Tag" button.
Note that the created event tag needs to be integrated within your source code afterwards in order to track the event you created the tag for.
Here’s a list of the HTML events(actions) used and their description:
- onclick: The user clicks an HTML element
- onmouseover: The user moves the mouse over an HTML element
- onkeyup: The user releases a key
- onkeypress: The user presses a key
- onchange: An HTML element has been changed
Integrating an Event Tag Within Your Website
Once you generate your new event tag, integrate it into your website by adding it to each element you want to track (depending on your website builder platform). You can add the tag our app provides, either directly within the element's code or as a separate script, as shown in the tutorial below.
Here is an example for a button in HTML and how it should look like so that the click on that button is tracked as an event:
<button id="important-btn">Click me!</button>
Option A: JS snippet
<script>
document.getElementById("important-btn")
  .addEventListener("click", function(){
    va("send", "event", "example-category", "btn-click", "Important Button")
  });
</script>
Option B: directly on the element
<h2 onclick="va('send', 'event', 'example-category', 'btn-click', 'important', 123);">Important button</h2>
Both options are semantically correct and do the same thing in the ideal case.
However, Option A allows for more flexibility. The limitation with Option B is that it might be overridden by some other JS code that is loaded after the DOM is rendered ( element.onclick = function(){ ... } ), thus causing our code never to be called.
In comparison, Option A allows an unlimited number of event listeners to be added (as long as the memory on the user agent device can withstand it).
This section of the Module Settings allows you to select which type of event you want to be tracked by our platform: manually created event tags, default events being auto-tracked or both.
Once accessed, you will have two types of settings available:
- General Event Tracking Settings: This setting allows you to enable or disable the following options:
- Define Default Events for Auto-Tracking - enable/disable only the tracking of automatically identified events
- Track Manually Created Event Tags - enable/disable only the tracking of manually added events
- Auto-Tracked Default Events: This setting shows you what elements (Input, Select, TextArea, Button, RadioButton, Checkbox) on the site could be automatically identified with the current version, and the actions (On Mouse-Over, On Click, On Key Up, On Change) that can be tracked for each element.
Important Notes:
- This feature acts 100% complementary to any manual event tags, so without the need to add any manually created tag snippets to your source code. Just turn the Auto-Tracking ON to get it started.
- For Wix websites, only Auto-Tracking is possible (at least for the moment), so there will be no option to track manually created event tags.
- The Labels of the elements, are automatically procured from your HTML page, so directly from the code, as they were called when the site was built. If you want the label of a tracked element to have a different name, that needs to be changed within the HTML of the page directly.
Both the Category and the Action labels of these auto-tracked elements are standard (as per the list presented above) and cannot be edited. - Elements that are part of a pop-up, or something dynamic that appear on your page as a result of certain actions taken by the user, they may not be properly treated by our system (e.g., Hovering an image of a product that will make a "Buy now" button to appear, might be one of the cases when we cannot track fired events on that newly appeared element, since it's not something static that was on the page from the beginning).
- Very soon, we will also add other elements for which these fired events can be tracked, such as images, links, videos etc. for the next version(s).


