
- Frequently Asked Questions

- All About Features
- How to Install the Tracking Code
- User Guides
- Integrating With Other Platforms
- Legal, Data Privacy & Certificates
- White Label Analytics
- Glossary
- Affiliate Program
- Contact
Frequently Asked Questions about using TWIPLA as Standalone App (FAQ)
General
1. How do I install TWIPLA on my website?
TWIPLA can be easily added to any type of website. You can either install one of our dedicated plugins/modules (depending on the platform), or simply embed a tracking code within the <body> and </body> tags of your source code.
You can find detailed information on how to add your tracking code or install the plugin app on any type of website in our install guide here. Also, please do not hesitate to contact our support directly if needed!
2. What should I include in my Privacy Policy?
We created a template in order to assist our customers to be compliant with data protection laws and to make all the personal data information easy to understand and control. Check this page out for more details.
3. Is TWIPLA GDPR/CCPA compliant?
It's great to see such an interest regarding GDPR and other data protection info! We value our customers a lot and we know that you are concerned about GDPR - so, no worries! TWIPLA is 100% GDPR ready.
Here is our GDPR Commitment — a page about what's all about GDPR and how we comply and safeguard the personal data.
Since we, as an analytics solution, are the processors for the website owners, we also prepared a Data Processing Agreement in the settings of the app, that you can sign and download at any moment.
We also prepared data privacy modes, changed the notification preferences and made all the docs easy to find and read.
If you’re wondering what to insert in your privacy policy and you're using our app, we got this covered too. Here's What to Include in Your Privacy Policy and the list of cookies and their info.
4. What happens if I already used the standalone version of the app (or one of your plugins) and want to switch to another plugin?
If you've already embedded the tracking code in your website's source or used one of our plugins for platforms like Drupal, Typo3, Weebly, WordPress, etc., and you want to switch to another platform (for which we also have a plugin/extension), follow these steps:
- Install the plugin for the new platform.
- Log in with the same TWIPLA account.
Please note that if the domain changes during this transfer from one website builder to another, logging into our plugin for the new website will add it to your TWIPLA account with its corresponding tracking code, starting fresh.
Even if you have multiple websites within your account, created on different website builder platforms, you can use our plugins to check the stats individually from each platform's backend. Alternatively, you can manage all websites and view the stats for each in one place by logging in here using your TWIPLA account.
5. Does TWIPLA offer an affiliate program?
Glad to know that you're interested in the affiliate program.
Refer customers to TWIPLA and earn 20% commission on any of their payments! Create an account and start earning money.
You may find out more about our program here.
6. Can TWIPLA replace Google Analytics?
Yes, TWIPLA offers statistics and collects your website visits and visitors.
With TWIPLA you will forget all those cluttered graphs, drop-downs or overwhelming charts and you will see how your website is performing using a friendly interface and simple graphs!
Another note that we really care about: we do not cross track, we do not work with advertisers and all the data is yours.
7. Can TWIPLA replace Hotjar?
Yes, TWIPLA offers behavioral features such as recordings, heatmaps, funnels and others. Find more about all of them, by simply navigating on the site, to each of the corresponding functionality.
Also, here is a wider tour of the app, where you can watch all the explainer videos.
8. Can TWIPLA replace Analytify?
Yes. Unlike Analytify, which is a summary of Google Analytics, TWIPLA has its own tracking infrastructure. This comes to an advantage because we can develop a lot of features which the other platforms that are based on Google Analytics can't. For one, we can show what each visitor does on an individual basis.
9. Can TWIPLA replace Mouseflow?
Yes, TWIPLA offers statistics and collects your website visits and visitors.
10. Why do I keep getting an error saying that the tracking code is not successfully installed?
As long as the visits are being tracked, this is not something you should worry about!
Most probably, there is a space or a character missing or added extra in the code, and our code checker cannot find it in the form in which it expects to find it. Or the source code is not publicly visible (due to an iFrame your website is in, or a redirect from a domain to another) and the checker cannot find it at all.
Rest assured, this can be easily dismissed. Just contact us and we'll have it checked and set on successfully installed, if everything is working properly.
11. The snippet does not work in the header in my website builder. How can I fix this issue?
If you're encountering an issue where a script snippet doesn't work when placed in the header of your website builder, it's likely due to the script executing before the Document Object Model (DOM) is fully loaded. This can result in an error like "Uncaught TypeError: b is undefined."
To resolve this issue, you can place the script in the header, but ensure it starts execution only after the DOM has fully loaded. Here's a code snippet that accomplishes this:
<script> document.addEventListener("DOMContentLoaded", function () { (function (v, i, s, a, t) { v[t] = v[t] || function () { (v[t].v = v[t].v || []).push(arguments); }; if (!v._visaSettings) { v._visaSettings = {}; } v._visaSettings[a] = { v: '1.0', s: a, a: '1', t: t }; var b = i.getElementsByTagName('body')[0]; var p = i.createElement('script'); p.defer = 1; p.async = 1; p.src = s + '?s=' + a; b.appendChild(p); })(window, document, '//app-worker.visitor-analytics.io/main.js', 'INSERT-HERE-YOUR-WEBSITE-ID', 'va'); }); </script>This code ensures that the script in the header won't load until the DOM is fully loaded, preventing the previous error.
However, for most websites, it's often recommended to add scripts to the bottom of the body, as this approach typically avoids such issues altogether.
Manage your account
1. How to create a TWIPLA account?
Access all the tools you need as a website owner to track and analyze your statistics and visitors in one comprehensive application. Experience the features with our free plan for The All-in-One Analytics App by going to this link then click Register.
2. Why can't I log into my TWIPLA account?
There might be some factors causing difficulties when logging in. To log in successfully, we'd like you to make sure that:
- You already have a TWIPLA account. If not, create one.
- The email address and the password you've entered are correct. You can request or reset a new password on the login window by selecting 'Forgot Password?'.
- Your account is confirmed within 10 days of its creation. Upon creating your account, a confirmation email will be sent instantly. However, you can log in during the first 10 days without confirming it. Reminders will be sent after 3, 7, and 10 days.
Important Note: Ensure confirmation through the most recently received reminder, as previous ones, if any, are no longer valid.
Hint: Another method to confirm the account would be to try and log in, and when the error 'Account was not confirmed' appears, there will be an option to 'Resend the confirmation email.' That will send you a fresh and valid link to activate your account.
Do not hesitate to contact our support directly if needed!
3. How can I delete my TWIPLA account?

We're sorry to see you go!
Before proceeding with deletion, please be aware that deleted accounts will lose access to all analytics tied to your account, and the deletion is irreversible.
If you're certain about deleting your TWIPLA account, the process varies based on your subscription. Start by canceling all subscriptions and removing all websites from your account.
Once these steps are completed, follow the instructions below to delete your TWIPLA account:
- Log in to your TWIPLA account..
- Go to Account Settings from the upper-right corner.
- Select My Account from the left-side menu.
- Click on the Delete Account button.
- Insert your password to confirm, and select Delete Account.
Note: Ensure you have removed all your websites before proceeding with the deletion of your TWIPLA account.
Manage your websites
1. Can I have multiple websites within the same account?
Yes, you can manage an unlimited number of websites under the same account. To learn more about how to manage them, you can find additional information here.
2. How do I add or remove websites?
TWIPLA enables you to add an unlimited number of websites to your account. Each added website has its own tracking code, settings, and subscription area, and you can manage them all from one place.
Adding a New Website
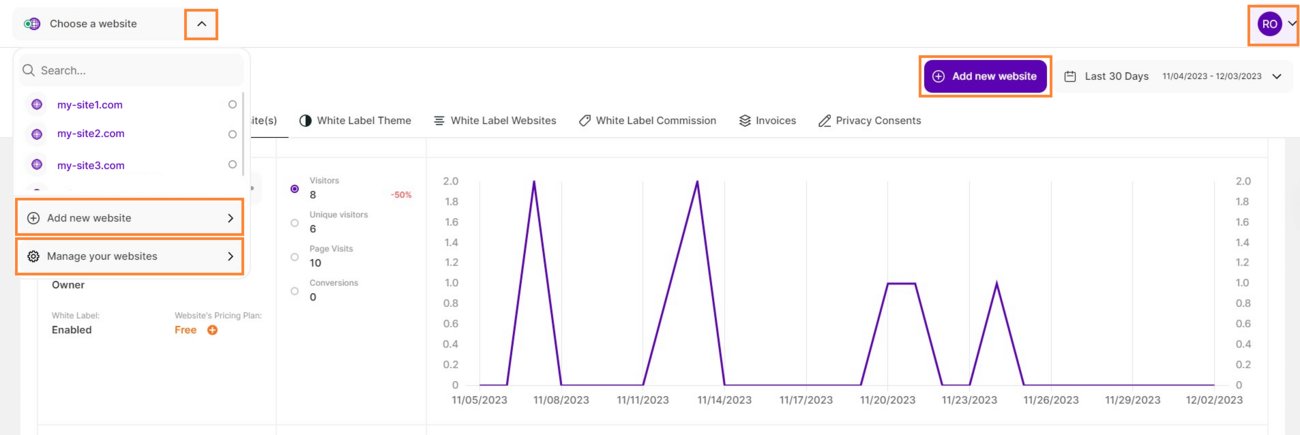
- Log in to your TWIPLA account.
- Click the drop-down menu from the upper left corner labeled Choose a website.
- Click the Add new website button (this button can also be found in the upper-right of the screen if you go to Manage your websites).
- Add your new domain and then choose your preferred Data Privacy Mode.
- Install the tracking code on your website. Check here the installation guide. Alternatively, you can choose to install it later by clicking the Install Tracking Snippet Later button.
Note: You can add as many websites as you want and select the Subscription Plan that suits your website traffic. Each website will be billed independently, but you can manage them all from one account.
Removing a Website
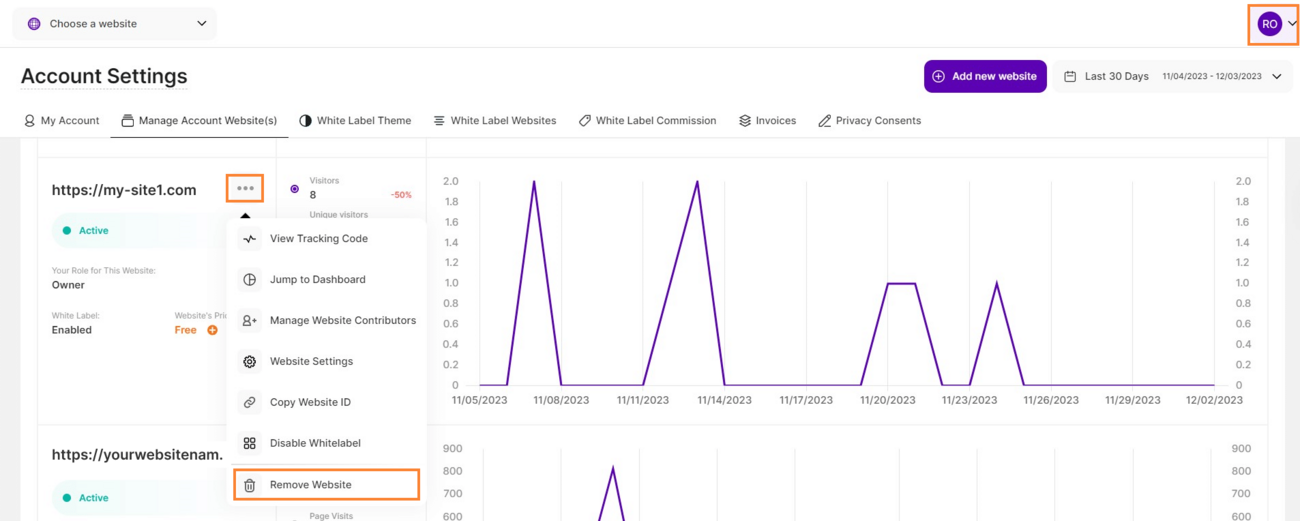
- Log in to your TWIPLA account.
- Go to Account Settings > Manage Account Website(s) (or select Manage your websites from the drop-down menu in the upper left corner).
- Identify the website you want to remove, click on the 3-dot menu, and then select Remove Website.
- Insert your password to confirm and click Delete Website.
3. How do I add or remove contributors for a website?
As a contributor, a user may view (without editing permissions) all your website analytics, including information such as Visitors, New visitors, IP addresses (if IP anonymization is not enabled), Page visits, Bounce rates, Conversions, and even live visitors from the moment they join the website.
Note: Subscription Settings (billing, card details, invoices etc.) will not be displayed for any contributor.
Add a Contributor
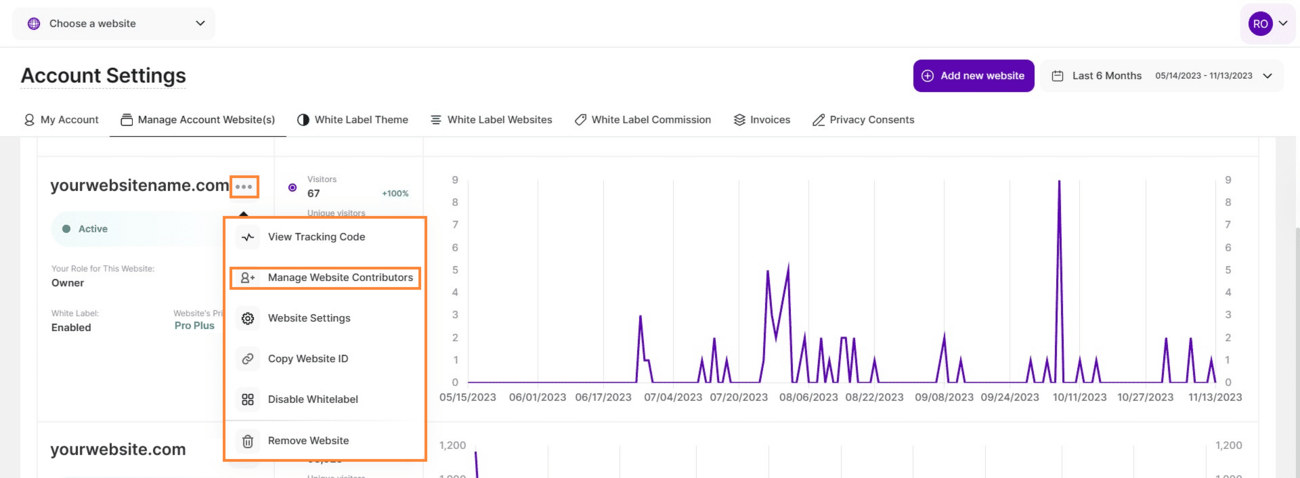
- Log in to your TWIPLA account.
- Go to Manage your websites.
- Identify the website that you want to add a Contributor to.
- Click the three-dot menu icon then select Manage Website Contributors.
- Go to Add a New Contributor, enter the email address of the person you would like to invite, and specify their account role.
Note: If the Contributor already has a TWIPLA account, they just need to accept the Contributor role, and the website data will be displayed in their account. If the Contributor is not registered, they should first sign up by going to this link, click Register and create a TWIPLA account to be able to accept the Contributor role. You can read more about the different roles here.
Remove a Contributor
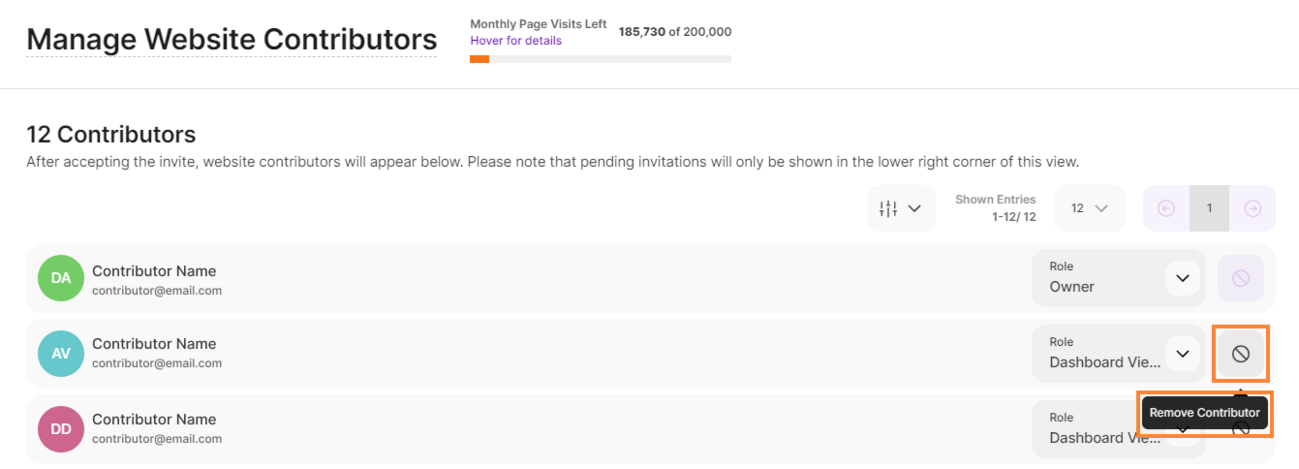
- Log in to your TWIPLA account.
- Go to Manage your websites.
- Identify the website(s) with contributor(s) that you’d like to remove.
- Click the three-dot menu icon then select Manage Website Contributors.
- Click the no symbol icon on the right side of the contributor’s name.
- Enter your password to confirm and click Delete.
4. How to Accept or Deny a Contributor invitation for a website?
As a contributor, you may view (without editing options) all the website analytics that you will get access to: visitors, new visitors, IP addresses (if IP anonymization is not enabled), page visits, bounce rates, conversions and much more from the very moment you accept the contributor role.
Accept a contributor invitation

- Check your mailbox and open your contribution invitation.
- Click on Accept Invitation.
- Register or Login to TWIPLA (depending whether you have an account or not) by going to this link.
- Accept the contributor role when the notification is displayed.
- Or if the notification has been already closed, just go to Manage your websites and identify the website(s) that have your role in Pending status and Accept it (usually they are the last websites in the list).
Deny a contributor invitation
- Log in to your TWIPLA account.
- Deny Contributor Role when the notification is displayed.
- Or if the notification has been already closed, just go to Manage your websites and identify the website(s) that have your role in Pending status and Deny it (usually they are the last websites in the list).
Opt out as a contributor from a website

- Log in to your TWIPLA account.
- Go to Manage your websites.
- Identify the website that you want to remove yourself as a contributor.
- Click the three-dot menu icon then select Leave Website.
- Insert your password to confirm and click Leave.
Notes:
- Contributors will not have any access to the Subscription Settings (billing, card details, invoices etc).
- The contributor role is applied on a per-website basis, not per account. If you want someone to be a contributor for multiple websites (or vice versa), you must follow the above steps for each website individually.
1. Which subscription plan is the best fit for my site?
Choose the plan or platform that best suits your needs, pay as you grow, and switch plans based on performance whenever you want—no strings attached.
We offer multiple plans tailored to different levels of website traffic, allowing you to select the one that fits your current needs. If your site's traffic increases, feel free to switch plans at any time. Explore our packages here.
For a custom plan designed specifically for your high-traffic site, reach out to us, and we'll make it happen!
3. Is the Free plan going to expire?
No, you can use the Free plan indefinitely. However, be aware of some limitations, with the most significant being the inclusion of 400 page visits per month. Explore all the features included in our plans and their respective limits here.
4. What happens when the limit of the included visits in my plan has been reached?
Once you reach the limit, TWIPLA will stop tracking new visits until the beginning of a new month or until you upgrade to a higher premium plan, at which point the limit is lifted.
- Remember, during the period between reaching the limit and the start of a new month or your plan upgrade, your data won't be tracked. Even if you upgrade later, the data from that period will be lost.
- In-app notifications are available to alert you as you approach the limit: at 50%, 75%, 90%, and a final pop-up message when the limit is reached at 100%. Checking the app's dashboard regularly is recommended to ensure you catch these notifications on time.
5. How do I apply a promo code when I purchase a premium plan?

We're excited to see your interest in upgrading to TWIPLA Premium!
We understand you might want to explore TWIPLA before committing to the premium plan. That's why we occasionally provide discounts or even opportunities to access the app for free for a limited period. Rest assured, our offers come with no strings attached, and you have the flexibility to cancel your subscription anytime.
If you've already obtained a voucher code for our platform, here's a step-by-step guide on how to apply it:
- Log in to your TWIPLA account.
- Select your website to be upgraded.
- Go to Website settings > Subscription.
- Click on the Upgrade now! button. Alternatively, you can also click Change Plan.
- Select the desired plan you want to purchase from the drop-down list.
- Choose Monthly or Yearly.
- Complete your billing information if it hasn't been saved before.
- Enter the email address for your invoice and choose your Country from the dropdown.
- Do not forget to include your Business details and VAT-ID(if applicable) in the Optional Invoice Contents section.
- Click the Upgrade Now button, select your preferred Payment method and enter the required payment information. Currently, we have two options available: PayPal and Pay by card.
- Review the breakdown of the charges below to make sure that the discount has been applied to the final price and tap Subscribe now to purchase the plan.
- Reload the TWIPLA app page to see the changes!
Note: Promo codes differ for each case, available for specific plans and durations. Be sure to check the details to grab the best offer that fits your needs.
6. How can I change my subscription plan?

Whether you are on a monthly or yearly subscription, you can switch plans at any moment!
Follow these steps to change your subscription plan:
- Log in to your TWIPLA account.
- Select your website to be upgraded.
- Go to Website settings > Subscription.
- Select Change Plan.
- Choose a new yearly or monthly plan and proceed to the payment.
Notes:
- If you already have a premium subscription which is active and want to change it, there will be a discount applied for the unused period of the previous one. However, if you've turned off auto-renewal for your current plan and want to upgrade to another one, the remaining unused period won't be considered.
- To prevent any interruption of the service, app subscriptions are set to renew automatically. You can turn off the auto-renewal at any time, if you no longer need it. At the end of the cycle, your subscription will end, and you will return to the free version of the app.
7. How do I update my Billing Information?

Follow these steps to update your billing information within the subscription settings:
- Log in to your TWIPLA account.
- Select your website.
- Click on Website Settings, then select Subscription.
- Update your Billing Information form.
- Click Save Changes.
Note: The information saved there is not automatically filled on your invoice(s). If you want these details to appear on your invoice(s), you will have to open each invoice and add these details manually.
8. How do I add or change credit card details?

The payment method will appear only after the first payment has been made. That will allow you to purchase an upgrade or change your subscription plan for a website, using the same payment method.
If you want to change your registered payment details, please follow these steps:
- Log in to your TWIPLA account.
- Select your website.
- Click on Website Settings, then select Subscription.
- Under the Payment Method, tap the pencil icon and update your payment information.
- Click Save Changes.
Note: The revised payment information can only be used for bills generated after the changes were made.
9. How do I download my invoice?
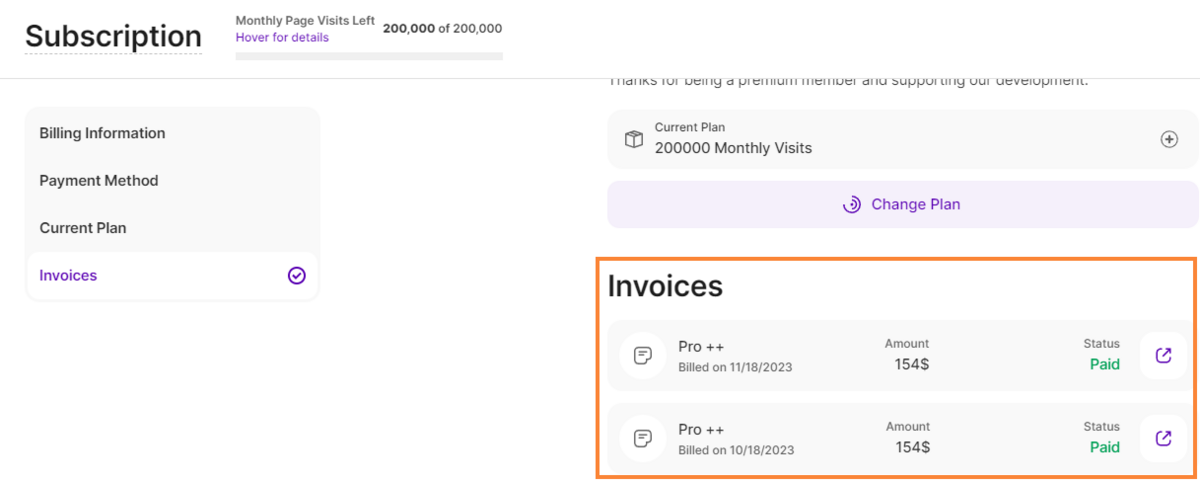
All invoices will be issued monthly or yearly, based on your subscription plan, and you can view and download them at any moment.
Follow these steps to view and download your invoice:
- Log in to your TWIPLA account.
- Select your website.
- Click on Website Settings, then select Subscription.
- Go to Invoices to view and download the needed invoice.
Note: if you have multiple sites and subscription plans, you can view all your invoices in one place by going to Account Settings (upper-right corner) and select the Invoices tab (check the previous question for more details).
10. How do I manage my invoices for all my websites?

Go to Invoices and check the list of all your invoices for all your websites in one place.
Important Notes:
- These invoices only refer to "non-Wix websites". The billing for Wix websites is done separately on WiX.
- The invoices appear in your account within 24 hours after the purchase.
- This view includes all invoices from all websites added to your TWIPLA account. If you want to have a list of only website specific bills, please go to Website Settings > Subscription > Invoices.
The table is made up of the following columns:.
- Billing date: Date that the invoice has been created.
- URL: Refers to the internet address of the website this bill refers to.
- Amount: The billing amount in USD (further currencies will be available soon).
- Status: Status of the payment (Paid, unpaid, etc.).
- View: By clicking on the corresponding download icon in this table, you will be forwarded to a new screen where you can view the invoice.
Feature Functionality
1. How do I get easy access to TWIPLA using my mobile phone?
If you want to open the TWIPLA Web-App on your mobile device, you usually have to open a browser first, enter the web page address, search, and then log in. This all takes a relatively long time. If you bookmark a page within your browser, you save a lot of time. It works similar to a mobile app, but doesn't consume your phone's memory. Here are a few steps to create a TWIPLA dashboard shortcut for Android and iOS devices quickly and easily:
Android
- Open your mobile browser.
- In the address bar enter this link: https://app.twipla.com/.
- Select the “three dots” icon in the upper right corner of your browser.
- Select "Add to Home Screen."
- Give the App a name and select "Add."
- Easily launch the web app from your phone's home screen.
Note: The buttons and icons may vary depending on the browser used (some browsers may no longer offer this possibility at all). For instance:
- Chrome, Opera, DuckDuckGo have similar options.
- Firefox features a home icon with a "+" inside it.
- Edge offers the "three dots" icon in the lower right corner.
iOS
- Open your Safari mobile browser.
- In the address bar enter this link: https://app.twipla.com/.
- Tap the "Share" button at the bottom of your browser.
- Select "Add to Home Screen."
- Give the App a name and select "Add."
- Easily launch the web app from your phone's home screen.
2. What are the limitations of the Visitor Recordings feature?
Visitor Recordings allow you to record & play videos of what visitors did on your website!
We know how important it is to see what your customers do on the website. With Visitor Recordings, you will replay the full visitor experience, identify pain points, boost conversions, and optimize your site. However, there are some limitations that prevent us from recording certain things on your website, due to some technical security clauses.
Websites come in all types and, unfortunately, there are some limitations to the Visitor Recording feature:
- If you have iFrames, images or SVGs being part of a deeper iFrame, you may see a Content Unavailable message at the moment, as we cannot access iframes. The third party contents are on a different domain and our javascript cannot catch it. Same for the recordings created for visits by users who have AdBlockers in use on their browser.
- If your Wix blog or site has additional pop-ups, apps or widgets installed, TWIPLA won't access that information due to security reasons, as those are third-party apps and our code is added to your website domain.
- Parallax scrolling is best replayed via Firefox browsers.
- Some dynamic pages may encounter issues in displaying hover elements (such as eCommerce apps within Wix).
- Some records might not appear in your list, due to the fact that visitors have the Do Not Track option enabled in their browsers. Another possibility would be the Easy Privacy option enabled within their ad-blocker/extension.
Note: If none of the exceptions described at this point applies to your visitors, they need to exit the website for you to view the resulting recording. It's important to note that even if your recordings show unavailable content, rest assured your visitors see the real content.
3. How do I export data for my website?
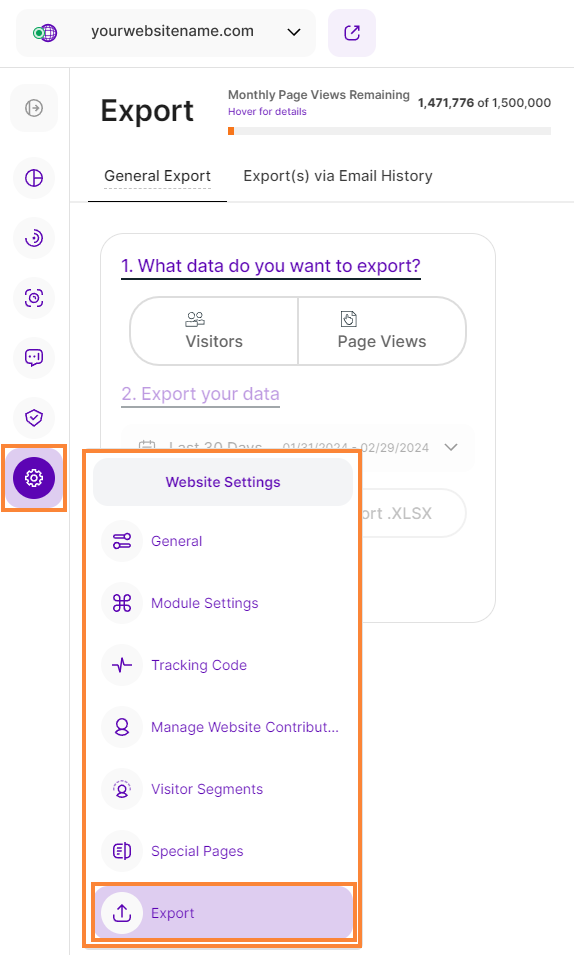
You can easily export your visitors' data or page views history as .csv or .xlsx at any moment! To do so, please follow these steps:
- Log in to your TWIPLA account and select your website.
- From the left-side menu, select Website Settings --> Export.
- Choose what data you want to export (Visitors or Page Views).
- Select the time range, and file type then click Export.
Everything about the Export feature can be found here.
Important Note: Great news! We've removed the 31-day limit, giving you the flexibility to analyze your data for any timeframe you need.
4. How do I track my URL campaigns?
URL Campaigns or UTM-parameters are NOT set up WITHIN TWIPLA app. They are just automatically recognized by the app everytime a visitor uses a UTM-Link that you have set up and embedded elsewhere. Here you can find out more about UTM Campaigns.
What if you could divide and check your campaign visitors by parameters like "source" or "medium" and easily see which parameters bring you the most visitors?
To find out the exact referrer (e.g. newsletter), marketing medium (organic, PPC, banner), campaign name or other information that can be tracked, simply add campaign parameters to your URL campaigns.
Please follow the steps below to do so:
- Go to our UTM URL Builder.
- Enter your website URL and fill out the form with your desired parameters (e.g., signup_button).
- Copy the resulting URL.
- Add it to your links and see how it works!
5. How approximate is the location of my visitors?
Since we're an analytics app we need to respect privacy laws and policies and we can only offer an approximate location of the visitors.
In order to understand this feature into more details, here are some things to consider:
- Usually, an Internet Service Provider offers an approximate location of a certain IP address (e.g. city, and sometimes, neighborhood), for security reasons. Now, when we show you the location of the visitor we are also obligated by law to not show the real provided address (this is the second layer of anonymity required by law) so we also display an approximate location.
- If the visits are performed using mobile phones, the location is given by the internet provider's main Wi-Fi tower (which usually is not located on the same street as the visitors).
- We check the locations based on the IP addresses, and each IP is registered with an approximate location by the service that assigned it. We are using this data as it is registered and updated by each internet provider and display it as it is.
Note: The location's pin moves from place to place, over a certain area, every time you refresh the map. The radius is respected by the app and it moves the pin all around in that specific area, precisely so as not to give you the impression that the visitor is coming from exactly that spot, but from that area.
7. How do I keep the "Ignore (Own) Visits for Tracking by IP" option activated for Safari?
Websites often store cookies and other data on your Mac. This data may include information that you have provided, such as your name, email address and preferences. This data helps websites identify you when you return to the site and can provide services for you and show information that might be of interest to you.
Our app is applying a cookie on your website, when you choose to ignore your own visits. Make sure that the cookies are not blocked in Safari, so that your “Ignore (Own) Visits for Tracking by IP” option remains active. To enable your cookies, go to Safari -> Preferences -> Privacy and uncheck the “Block All Cookies" option, then reload the app.
9. Can I block visitors from a certain country from visiting my website?
Regrettably, we're unable to block users from accessing your website; however, we do offer the option to ignore them. If you wish to ignore visits from a specific IP or a range of IPs, simply follow the steps outlined in the following article: Ignore (Own) Visits for Tracking by IP
Note: Ignoring visits from a specific IP means the visits are still occurring but won't be displayed in the stats. It's essential to consider that some visitors, even from your targeted region, might use VPN connections. In such cases, you may choose not to ignore visits from them.
10. Can I see the company information or the email address of my visitors?
TWIPLA is an analytics app which makes your website traffic easy to read and understand. You can just see from where your audience came from (referrals), IP & location, device, display size, operating system, browsers and their behavior on your site, visited pages, recordings, the areas with which they interact the most etc.
We can only provide you analytics about your website, so you can get a better overview on how you are performing or how to communicate more. Due to some privacy policies, analytics apps are not allowed to collect emails or any other sensitive information.
11. Why are there multiple IP addresses for the same visitor?
Visitors might often use VPN connections or have dynamic IPs, but they use the same browser to surf on your website. We track visitors based on their browser in use. If they use the same browser but have different IPs, we recognize them as same visitors.
You may also see the same IP address as a New visitor multiple times. If the IP is from the same router for multiple users, all of them will show up as unique visitors, since they are new people using different devices and implicitly different browsers, but have the same IP. This might happen in offices or wherever there are more people using the same Wifi router.
In order to see the entire history of an IP, just click the IP itself and then "See History".
12. Why is there no reference for some of the sessions?
Note that not all the websites are sharing their referrer. We highly recommend you to Check If Referrer-Policy Is Enabled, for those websites you are expecting a referral. There are some tools that can let you find out if your concerned websites have the referrer policy enabled.
13. How to increase the traffic on my site?
We're happy to share with you a few articles we have which may help you out in improving your site and may also help increase traffic as well. Check here all our Blog Posts.
Site Settings
1. What is a Dynamic Page and how do I set it?

In this view, you can group identical pages with different URLs (i.e., the same product page for different articles) on your website for clustered statistics.
Imagine you have an E-commerce website, there is a high chance that you will have the same "Thank you" page for all product purchases at the end of the checkout (even though this page has different dynamic parameters in its URL, based on the purchase). If you do not cluster these URLs, you will see data on each 'Thank you' page, even though they are the same. Clustering these URLs allows you to view combined statistics for this page, but it will not alter your data.
If you want to add a new dynamic page for the selected website, please click on 'Add Dynamic Page.' A new modal will open, and you will need to fill out the fields. Try this functionality and analyze your results; there is nothing that can go wrong, and your visitors will not notice any changes.
Important Hint: You can view the statistics of your self-defined dynamic pages in various locations such as the Pages Dashboard.
2. What is a Conversion Page and how do I set it?

If you navigate to Website Settings > Special Pages, you can create a conversion type for each of your important pages or groups of pages.
For instance, if you have these pages: Shop and Cart, you can add them both as a conversion type named "possible buyer". If you do that, you can see the visitors that reach that pages (one or all of them) as Conversion visitors of "possible buyer" type.
Also, if you have "thank you for your purchase" page, you can set it as conversion named "loyal customer". If a visitor is reaching more types of conversions you can see them within the list o visitors as: Conversion types: possible buyer, loyal customer
You can also have a better view over the number of those page views, if you go to Pages > Conversion Pages.
Check out this article, it might be of help.
3. How do I ignore my own visits or an IP?

When your analytics display visits from both you (or your team) and external visitors to your website, determining your traffic performance can become challenging. If you wish to exclude specific visits from your data within the account, you have three options to choose from:
- Ignore visits from this browser: If you enable this option for your own visits, the application will not count any of this data. Visits from other users using the same browser (but with a different IP address), will still be tracked. This setting will remain active until you disable it or you delete the browser cookies. Please ensure that your browser allows cookies as well.
- Ignore Website Visitors Tracking Using this Link: If you anonymized IPs in your settings and you do not know the IPs of your team, or you simply do not want a certain visit to appear in your data, please share the link displayed to you at this place with these people. If they use this link to visit your website, their visit will not be taken into consideration for data tracking.
- Ignore IP address: Ignore visits from a specific IP address or from classes of IPs by using the * symbol at the end of the numeric label — e.g. if a class of IPs starts with 192.168.123 just add 192.168.123.* and the entire class will be ignored. After you add the IP, please click on the button Save Changes.
There are two types of IPs: static IPs and dynamic IPs. Having a Static IP means your IP addresses won’t change and you will have the same IP every day if you connect to the same network. The static IPs are an option for businesses rather than residences, because it’s very useful for dedicated services such as web servers or FTP, hosting computer servers, and it makes it easier for geolocation services to accurately estimate where you are.
On the other hand, most people have a dynamic IP and it will change constantly. And, as you can imagine, these IPs are automatically given by your Internet Service Provider and reliable with very little work from your side (or none at all), but the geolocation might be less accurate.
Notes:
- Ensure that your browser allows cookies when using the first option. Note that this option applies only to that specific browser. If you want to ignore your visits from any browser or device, follow the steps in the third option, Ignore IP address.
- If you do not know your IP or if it’s a static or dynamic one, just click here and you will easily see everything about your IP if you click Show Complete IP Details.
4. How do I anonymize my visitors' IP addresses?

To quote one of our favorite partners: TWIPLA is 100% GDPR-ready, ISO 27001 certified, and 0% shady.
So, if you want to track safely without getting your visitors’ IP due to privacy concerns in your country, you’re in the right place.
Here’s a step-by-step guide to anonymize all your visitors’ IPs:
- Log in to your TWIPLA account.
- Navigate to the Privacy Center. You can choose from any of these three data privacy modes:
- Level 2: Medium Privacy
- Level 3: GDPR Privacy
- Level 4: Maximum Privacy
- Select your preferred privacy setting by tapping the radio button on the right side of the card.
- Finally, click Save Changes to apply the new settings.
Once you set the anonymization option to on, all your visitors' IPs will not be stored. Everything about the Privacy Center and much more can be found here.
Note: By selecting IP anonymization, you will not see any IP addresses within TWIPLA. We are tracking your visitors through a cookie and not via the IP address and it will not affect your data at all.
5. How do I change the email address to receive reports on?
If you navigate to the General Settings of the selected website, you will find the Email Reportsoption. In this section, you can easily change and save the email address to be used for your Statistics Reports. Here, you can also enable or disable the option to receive Statistics Reports and set the frequency of reports.
To change the email address, follow these steps:
- Click the Add Email Address(es) to Which Email Reports Should be Sent box.
- Enter your new email address. You can click the (-) icon to remove the existing email address.
- Click Save Changes to apply the new settings.
Everything about the corresponding functionality of the app and much more can be found here.
6. How do I whitelist a domain/sub-domain for my website?

If you want to use TWIPLA on multiple domains connected to the same website, we have your back! Domain Whitelisting is now available in your General Settings, allowing you to whitelist as many domains as you need.
How this feature helps your business:
- By whitelisting a domain, you can include your website's tracking code on other domains or subdomains that you own and consider part of your website or business, such as landing pages, blogs, or temporary projects that you want to track.
- For example, if your website is mywebsite.com, you can whitelist your tracking code for blog.mywebsite.com, webinar.mywebsite.com, mywebsite.shopify.com and track all the visits under a single TWIPLA account and site. No need to have multiple tracking codes and keep switching pages to see your stats!
Follow these steps to whitelist your domains:
- Log in to your TWIPLA account and select your website.
- Navigate to Website Settings > General
- Scroll down to find the Domain Whitelisting section.
- Enter your domain under Domain To Whitelist and click Add to List.
- Click Save Changes to apply the new settings.
- Embed the same tracking code in the source of the sub-domain as well (same one as for the main domain).
After you add the domains:
- To view the whitelisted domains, check your General Settings and go to your Domain Whitelisting card.
- To delete a domain from the whitelist, select the domain, click the delete button, and then tap Save Changes.
- You can add or remove domains as you grow your business.
Note: Whitelisting your own domain adds an extra layer of security to your account as it will prevent other domains from using your tracking script!
7. How do I reset data for a website?

Resetting data will erase all your website stats, but your preferences will remain unchanged. If you opt to receive this data via email, we'll first send you a link containing your site stats archive and then proceed with the reset. Please note that these processes may take up to 24 hours, depending on your website traffic. While the reset is in progress, your stats will not be tracked.
To reset your data, please follow the steps:
- Log in to your TWIPLA account and select your website.
- Navigate to Website Settings > General.
- Scroll down to the Reset Website Data and click the Reset All Website Data button.
- Tick the box next to Send website data to me via email before reset if you want to keep a copy of your data before the reset.
- Enter your password to confirm and click Reset Data.
Note: All existing statistics will be permanently deleted by this operation. Once you reset the stats, the process cannot be undone.
GA Importer
1. When is it recommended to import data from GA?
We highly recommend importing your data after successfully installing our app on your website and tracking at least one visit with us for continuity.
If you already have data recorded with our app, and wish to start the synchronization, the importer will fetch the data up until the first visit recorded by us. This ensures a harmonious merge with the data you've already gathered.
You can also import your Google Analytics (GA) data when adding your website to your TWIPLA account, even if nothing has been tracked by our app yet. However, be aware that a gap might appear between the import start and embedding our tracking code. This is because the importer brings data up until the moment you start it, and the data between these two points in time will be lost.
Important Note: You can only import the data once per website!
2. Can I import data from my Google Analytics account multiple times on the same website?
Unfortunately, you can only import data from your Google Analytics account once per website.
3. Can I import data from 2 different GA accounts to the same TWIPLA account?
Yes, this action is possible. However, it's important to note that importing data can only be done on different websites, not on the same one. Importing is a one-time process per website.
To import data on another website from a different Google Analytics (GA) account, simply remove the permissions from your Google account for the TWIPLA app that was already used to import the data in the previous account.
4. When can I see the imported data?
You can view the imported data in real-time, as it progresses. Your data will be imported backward, starting from the most recent date and going back in time.
Typically, it takes about a day to import one year of data from GA, though this duration may vary depending on the volume of data.
5. Will the imported data affect my visits limit I have for my TWIPLA pack?
No, the data imported from Google Analytics is treated independently and is not counted against the page visits included in your plan.
7. What happens if I reset my data after I imported it from GA?
After importing your Google Analytics (GA) data to your website in TWIPLA, it is treated as TWIPLA's data. Consequently, if you reset your TWIPLA data, the GA data will be erased as well.
It's important to note that you can only import data from GA once per website, even if you reset it afterward.
8. How do I stop the import process?
Unfortunately, this action cannot be performed unless you delete the website from your account. Once the import process begins, it cannot be stopped or paused.
Feedback Answered Questions
1. How to apply Sumo LTD to my Account?

To apply the AppSumo plan to your website, please follow these steps:
- Log in to your TWIPLA account.
- Navigate to Account Settings and identify the website you wish to add the plan to.
- Click the three-dot menu icon then select Apply Sumo LTD.
The Apply button is a required step since we want to let you select the sites that you want to apply the codes on, instead of making the deal default to all your sites.
Note: In order to apply the deal to a different website, you will have to delete the current website where you have applied the AppSumo plan so you can have the option to apply that slot again to a different website. Unfortunately, it cannot be downgraded to FREE.
2. Do you have any running bug bounty programs? Do you offer rewards if we report you some vulnerabilities?
Unfortunately, we do not run any bug bounty program at the moment, we are sorry.
What we can do instead is to offer you a discount for purchasing any of our plans, if you have our app installed on your website and you want to upgrade. We can offer you a 20% OFF on your first billing cycle, for any of the selected subscription.
6. Can I bypass adblockers with TWIPLA?
Our app can still track the visits even if there are AdBlockers running, except for when the user has set the EasyPrivacy option from the settings of the Adblocker (if it exists), which will block any tracking app from tracking the activities in that browser. You can find more if you look for this term EasyPrivacy for AdBlockers, on Google.
7. How to recognize bots?
Please note that a bot does not spend much time on a website, it just checks it for new updates. Usually, they act like a visitor visiting only one page, but multiple times in different sessions. If the visits are on the same page multiple times, after just a few seconds, and the visitor is considered NEW (therefore a new session was created in no time after the last one with the same IP/device on the same page), then those are most probably bots.
The only chance for them not to be bots, is for certain users to have cookies blocked, or to use Incognito, but it happens too quickly to be human, and it happens on the same page in just a few moments.
I'm truly sorry for this, there are thousands of bots filtered by us, but these user agents, they seem to escape us. We assure you that we'll try to improve our filters and see how we could ignore a larger amount of bots, since they are permanently changing.
Until then, there is a workaround to manually ignore some of them by their IP address (8th question) in our Feature Functionality section, or block the access to some bots, creating the robot.txt file and exclude some of the major ones.
8. How to update the Payment Method?
Simply go to Website Settings -> Subscription -> Payment Method. Note that if you updated your payment method, it will only be displayed after your next billing cycle.
9. Do you track Keywords or Search Words?
Unfortunately, at the moment, we do not track the keywords that visitors have used in the search engine to reach your website.
10. How to cancel the TWIPLA subscription?
You may cancel the auto-renewal at any moment by heading to Website Settings > Subscription > Payment Method > Turn off auto-renewal.
Can't find an answer to your question?
There's a chance we might not have an answer in the list above.
But we're here to help! Feel free to Contact Us if you can't find the answer on our FAQ page or in the Support Center.